Systems Configuration & Restart
The XCore Portal allows users the flexibility to make configuration changes in both real-time and in the background pending for a restart of the system. All configurations can be made through the following components:
- XCore Real-Time Config– live changes to the XCore system
- XCore Pending Config– Changes which will only take effect after a restart (“apply & restart”) of the system
- Config Automation– Changes made automatically using predefined rules
Note: All live configurations can also be accessed directly from the specific component
Note: Some changes can only be done from the pending config module
XCore Configs
The Real-Time Config component shows the running configuration and lets you edit the fields available for live changes, such as markups, aggregation settings and A-book or B-book execution settings.
The benefit of the Real-Time Config component is having all live, configurable fields easily accessible from one screen. Alternatively, live changes can also be made directly from each respective component.
Live changes can also be automated using the Config Automation component.
video=1109021378
Note: Some changes cannot be made in real-time and in such cases, the Pending Config component will need to be used.
The Pending Config component gives XCore Users the ability to make any configuration changes to their XCore system in the background. This may be useful to make multiple changes in one go and to make changes which cannot be performed in real-time.
This component is designed to be a central control through which the following actions can be carried out.
- Add new configurations
- Delete existing configurations
- Update configuration changes
- Verify configuration changes
- Deploy configuration changes and restart the XCore
WARNING: Please take care when restarting your XCore as it will cause a brief disruption to pricing and trading. XCore owners are always advised to perform XCore restarts outside of market hours or during times of low trading activity.
video=1109020835
Note: For live changes you can use the Real-Time Config and for automated changes, the Config Automation component.
Apply & Restart
The Apply and Restart function applies all pending changes and restarts the XCore system. This causes ALL pricing and trading connections to be briefly disconnected.
Any change performed via the Pending Config component will require the “Apply and Restart” function to be applied and as such, it is advised that where possible, the real-time config component is used to make live changes.
Verify
The Verify function is a pre-restart check that the system performs to confirm, or verify, that there are no conflicts in the pending changes.
This can be used to check pending changes so that when the “Apply and Restart” is scheduled, it can be carried out quickly by minimizing unexpected errors.
The Verify function will NOT cause a restart of the system and hence will not disrupt any active connections.
Reset
The Reset function reverts all pending changes.
The Reset function will NOT cause a restart of the system and hence will not disrupt any active connections.
Backup and Restore XCore
The Backup and Restore feature on the XCore Pending Config Component is designed to enable XCore users to roll back the XCore settings to a recent restoration point without any involvement from the PrimeXM Support team.
This feature is not recommended to be used for minor changes which can be corrected or reset easily on the fly. The last 5 XCore setting database (DB) backups can be accessed and identified by their timestamp.
Important Note: DB backups are saved and available to be restored within the current week. Every Saturday DB backups from the week will be erased.
The Restore feature is applicable to the following situations, please note the list is not conclusive and it is simply based on the most common use cases:
- Major changes on the Pending Config component where multiple component settings have been affected
- Scenarios which require time-consuming manual corrections
- Correction on the new settings not working as intended where an immediate rollback is the only solution
Following the below simple steps to restore:
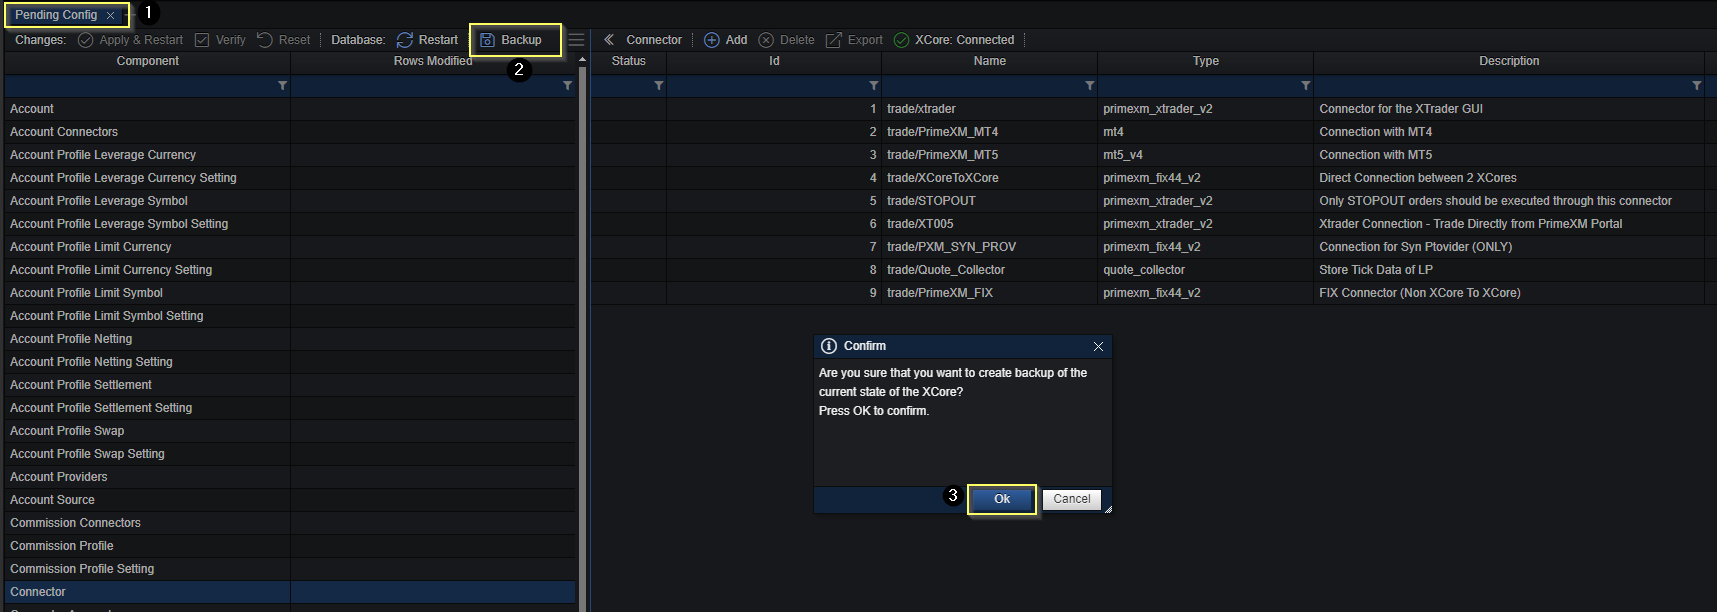
- Go to XCore Pending Config Component
- Click on the “Backup” button on the Database panel above the Component list, this is an optional step to save the current settings as a backup.
- Press “OK” in the Confirmation window to create a backup of current LIVE database
“Backup Operation Successfully Completed” message will be shown as a confirmation.
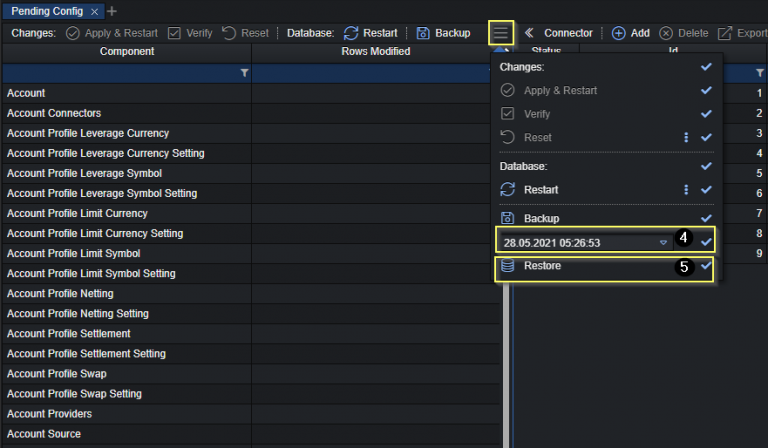
- Select the desired database version from the drop-down list
- Click “Restore”, a confirmation window will appear
- Press “OK” to revert to the selected database of settings.
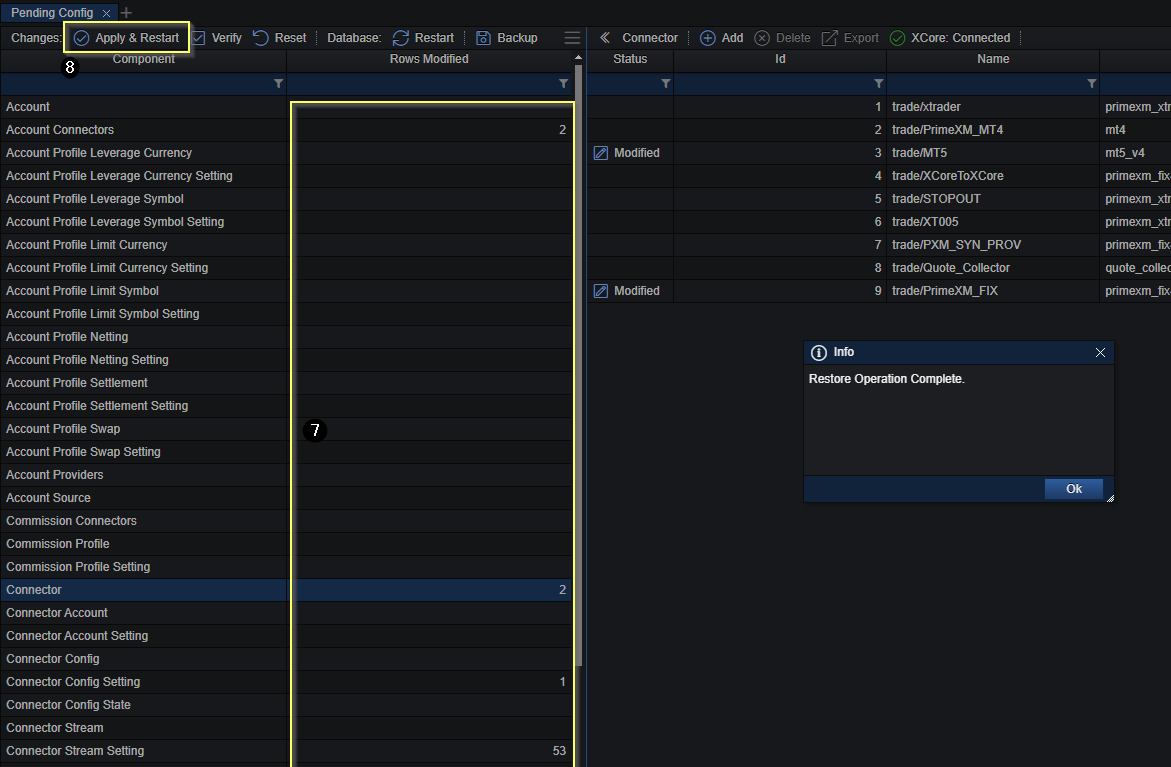
“Restore Operation Successfully Completed” message will be shown as a confirmation.
- Any changes comparing to the current state will be shown in the “Rows Modified” field next to the relevant component.
- Press “Apply & Restart” to apply all pending reverted changes and finalize the restoration procedure
The Config Automation component allows XCore Users to define specific rules that cause predefined actions to be automatically applied to the XCore system.
Users can use simple “if – then – else” logic to define automation rules for almost any configuration in their XCore. This may be useful to schedule changes to your configuration or create rules that trigger specific scenarios, for example, Failover Liquidity Providers, Scheduled Markups, and Holiday Trading Sessions.
Note: any item with view access can be used as the trigger filter condition, while any item with edit access is eligible for automation
Note: The config automation will over-rule manual configurations. For example, if an automation rule determines that a symbol should be enabled, the symbol will remain enabled even after it has been manually disabled.
Note: We strongly advise you to perform sufficient testing in regards to automation rules on your Demo XCore environment before enabling them in your Live XCore environment to ensure the configured rule is working according to your expectations.
| Name | Description |
|---|---|
| Session Periods | The time or period at which the automation should occur. This acts as the first trigger |
| Source Fields | The filter, which, if true, will trigger the automation |
| Target Fields | The targeted outcome of the rule. Possible value types: Filter – the specific values which should be updated. Each rule should only have 1 Filter per Item Field. In other words, it is not possible to Filter for multiple Values in the same Field Match – The automated outcome if the conditions in “Session Periods” and “Source Fields” are met Non-match – The automated outcome if the conditions in “Session Periods” and “Source Fields” are NOT met Note: Target fields are grouped based on “Item.” For example, the filter will not apply to the automation in case the item is different from the match/ non-match values* |
The conditions must satisfy both session periods AND source fields to be applied.
Multiple triggers can be defined, but ALL conditions must be met for the automation rule to execute.
Note: If automation rules are defined for specific time periods where settings should be reverted following the specified period, then users MUST specify a “non-match” value to revert to.
Source & Target Fields Examples
Source Fields Example
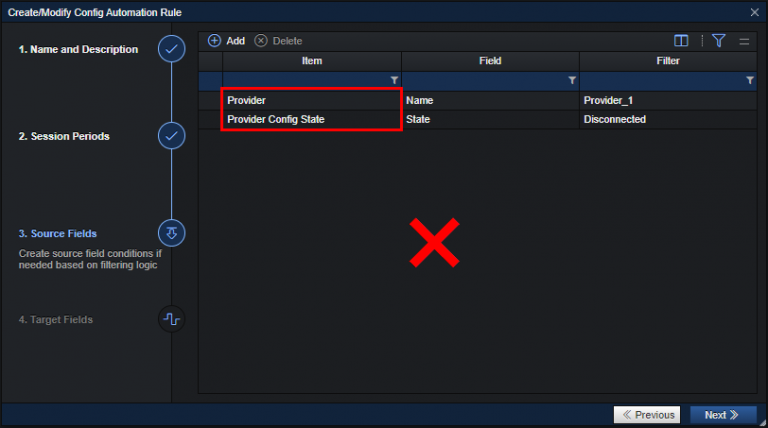
In the Source Fields, conditions with “AND” relations are grouped by item type (i.e. component table, such as symbol, provider, provider config state etc). All fields defined within the same item type (component) should be true in order to trigger the actions defined in Target fields.
If conditions (fields) are defined within more than 1 item type (component table), all conditions should be met to trigger the actions. However, it is important to note that different item types (component tables) may not be interlinked. The below examples illustrate the difference:
Both conditions are within the same Item “Provider Config State”.
When the Provider is “Provider_1” AND State is “Disconnected”, automation actions will be triggered.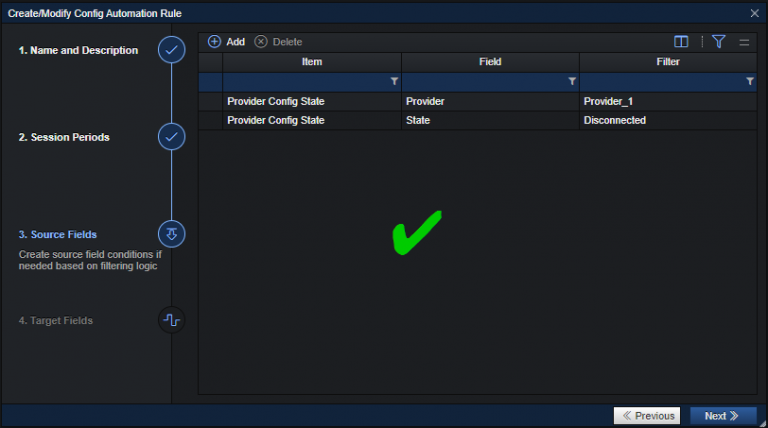
When the conditions are NOT within the same Item they are not linked: the Provider condition does not narrow the Provider Config State condition to “Provider_1”. The Portal does not save this rule, because a Provider Config State condition must filter both Provider and State (and a Connector Config State condition both Connector and Connected).
Target Fields Example
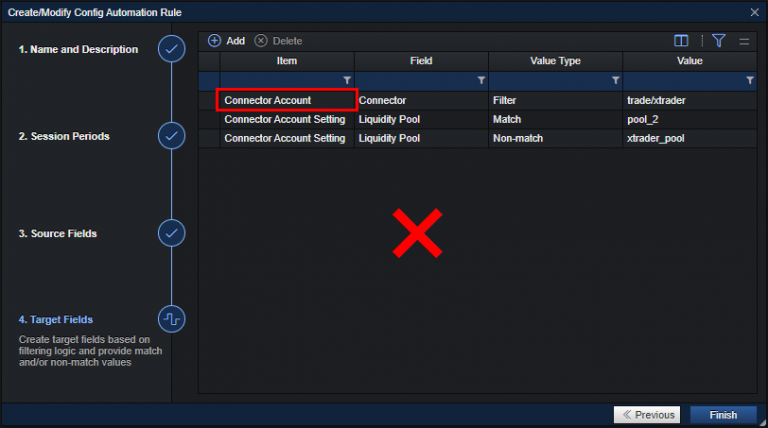
Target Fields are also grouped by “Item”.
Target field conditions belonging to different item types are independent of each other.
For example:
The Filter conditions in the following screenshot will have NO EFFECT on the Match/Non-match outcome which means that in this case, when the rule is triggered the “Liquidity Pool” for ALL Connectors under “Connector Account Settings” will be changed to “pool_2”
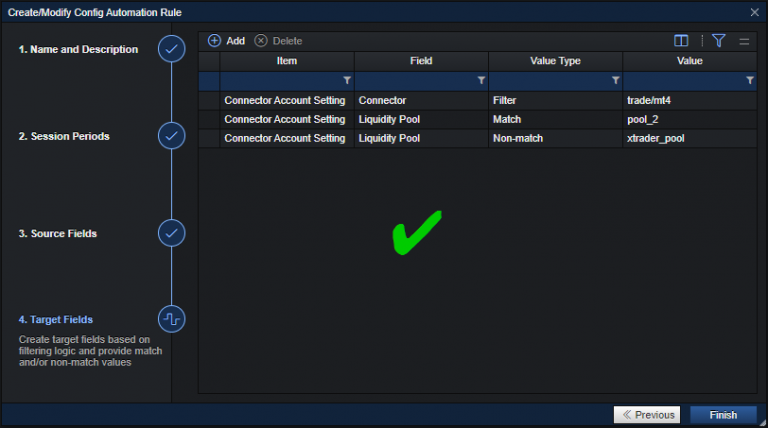
Instead, the item type should be the same so that only the “Liquidity Pool” for “trade/mt4” under “Connector Account Settings” will be changed to “pool_2”
How to Create an Automation Rule
Automation rules can be used to cause specific changes to the configuration based on predefined conditions.
Automation is configured in the Config Automation component of the XCore.
Add New Rule
- Click “Add” to create a new rule
- Choose a “Name” and “Description” for your new rule
- Click “Next.”
Define Session Periods
This is when the automation should occur and acts as the first trigger. You can define multiple sessions if necessary – the automation will occur if any one of the sessions is true.
- Click “Add.”
- Select a day and time the automation should start
- Select a day and time the automation should finish
- Click “Save.”
- Click “Next.”
Define Source Fields
This is an OPTIONAL step where additional triggers are defined. The system will check if ALL of the conditions in the source fields are true and if so, will execute the rule.
- Click “Add.”
- Item – select the component item for the trigger condition
- Field – select the specific attribute which contains the filter value
- Filter – define what value must be found to trigger the rule
- Where necessary, Users can add multiple source conditions. Source conditions have an ‘AND’ relationship meaning all conditions must be true for the rule to trigger
- Click “Save.”
- Click “Next.”
Note: if no conditions are defined under the source field, the automation will automatically occur at the start of the session period and stop at the end. If conditions are defined, then BOTH session periods and source fields must be true to trigger the automation.
Define Target Fields
This is where users can specify the target/outcome for the automation rule. There are 3 possible value types: Filter, Match, and Non-Match; none of the value types are compulsory. See the Config Automation page for a description of these values.
- Click “Add.”
- Value Type – Filter – define which values in a specific component (item/field) the outcome should be applied to.
- Value Type – Match – define the value in a specific component (item/field) to be updated if the session periods and source field conditions are met. Where Filter is defined, this will only apply to the filtered objects.
- Value Type – Non-match – define the value in a specific component (item/field) to be updated if the session periods and source field conditions are NOT Where the Filter is defined; this will only apply to the filtered objects.
- Click “Save.”
- Click “Finish.”
Note: For each rule, it’s possible to define different outcomes in multiple components. Outcomes are grouped according to the “item” such that if a filter is set for one item and match/non-match for another, no filtration will occur. To define multiple outcomes in the same component, separate rules must be created.
In the below example, if the conditions in session periods and source fields are true, then change the Liquidity Pool assigned to “FIX_1_pricing” stream to “Failover_pool” else assign “Agg_pool. “
New rules will always be disabled by default. Always ensure the rule is Enabled for the automation to occur!
How to Automate Fail-over Providers
Failover Providers (aka failover LPs) are used as a ‘back-up’ Provider in case your main or current provider disconnects. In order to better manage risk caused by such disconnections and avoid disruption to pricing/trading streams, you can now use the XCore Config Automation component to ensure a seamless switch over to a backup Liquidity Provider.
Failover can be configured to happen automatically in the XCore using the Config Automation component.
The Failover LP can be set in different ways using the Automation Rules depending on the XCore setup configuration and preferences.
Cases
Case 1: Failover Liquidity Provider (Enable Failover LP)
With this case scenario if the Main Liquidity Provider has been suddenly disconnected the Failover Liquidity Provider will be enabled in the system in order to continue streaming. In order for this case of the Failover Provider automation rule to work the prerequisite is to have the failover provider assigned on the main liquidity pool that are using for client, and the failover is disabled in the system so that it will be working only in cases of sudden disconnections of the main LP.
To set it up this rule the below please check the below steps:
- From the Config Automation component press Add button in order to start creating new automation rule and give accordingly a name and a description.
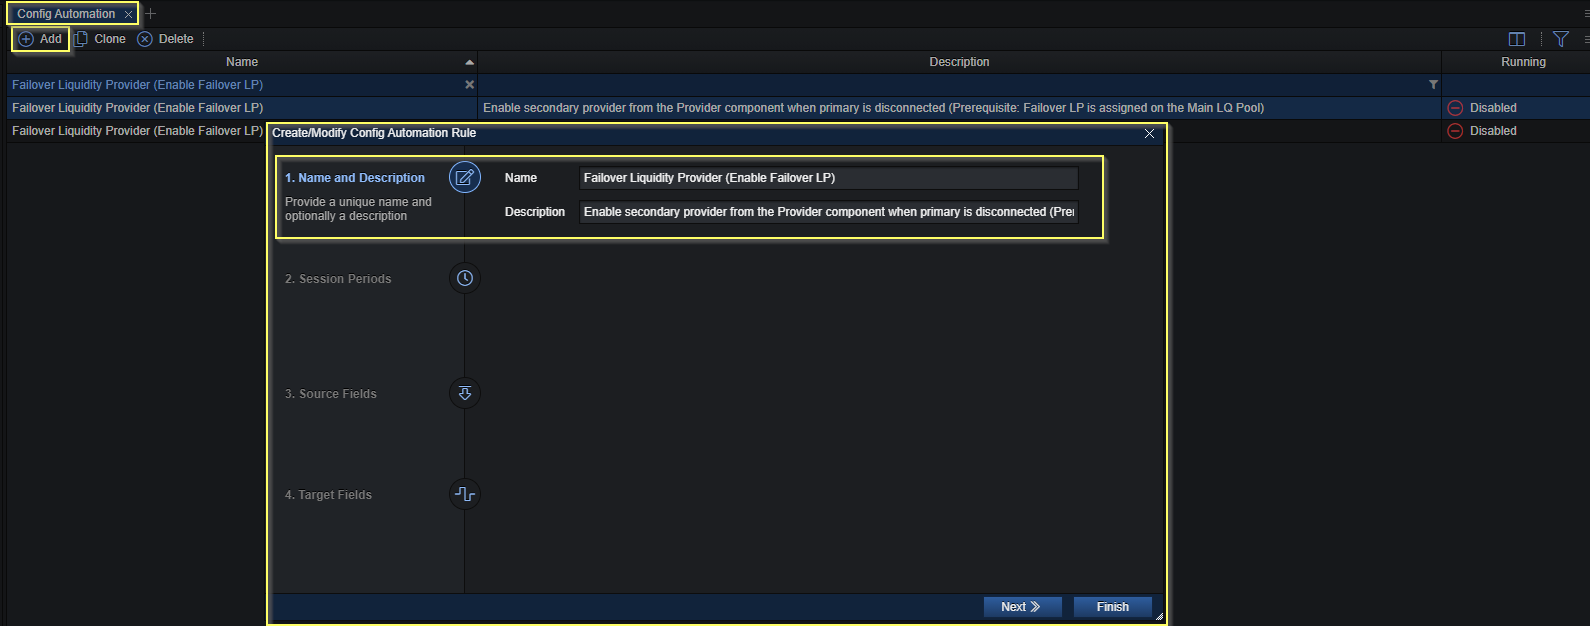
2. If needed you can define the time session when the automation rule should be active to check the system and act accordingly on the automation rule configuration.
Note: If the time session left blank the automation rule will be checking all the time the system and then act accordingly with the automation rule configurations.
3.Set the conditions in the Source Fields (if what should happen in the system) upon which it will trigger the automation rule.
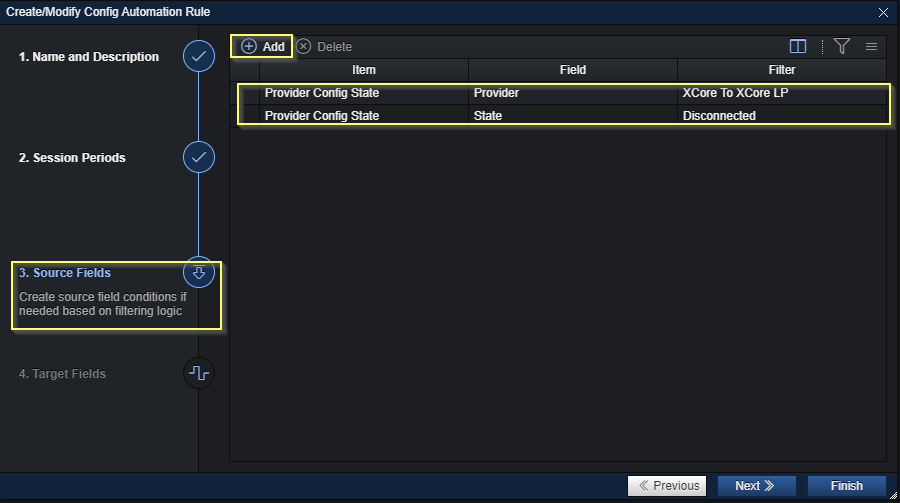
The IF conditions in this which acts as triggers are:
| Provider Config State | Provider | XCore To XCore LP | With this line the automation rule will be checking the state of the provider called “XCore To XCore LP” |
| Provider Config State | State | Disconnected | With this line the automation rule will be checking the state of the provider if it should be disconnected in order to trigger the rule |
4. Set the required actions in the Target Fields to be performed in the system if the automation rule is triggered.
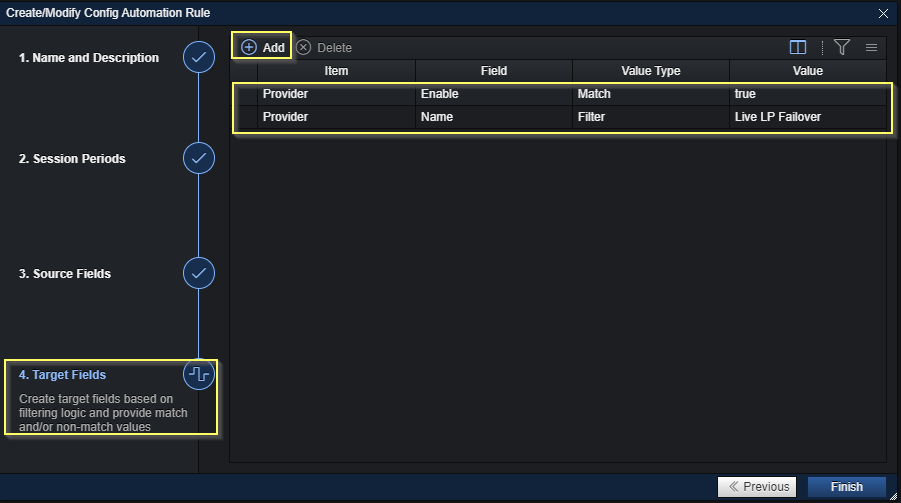
The targets on which changes the automation rule should perform are:
| Provider | Name | Filter | Live LP Failover | With this line the automation rule will filter in the Provider component for the specific provider called “Live LP Failover” |
| Provider | Enable | Match | true | With this line the automation rule will enable the previously filtered provider |
Finally, press the Finish button to save the automation rule, please note that by default the automation rules are disabled when created, therefore you will need to enable the rule and save if you wish for the automation to become active and start monitoring the system.

Revert back automatically to the use of the Main Provider once it’s connected back.
Once our Main Provider is connected back again we would like to use again, to ensure this we have created a second automation rule which in case it detects that our Main Provider is connected back again in the system then it should disable the Failover provider from the provider component leaving only the Main Provider to work.
- Created a new automation rule and give accordingly a name and a description.
2. You can either set up a specific time session for the automation rule to define when it should be checking the system in order to act accordingly or left blank which will mean that it will be checking the system all the time.
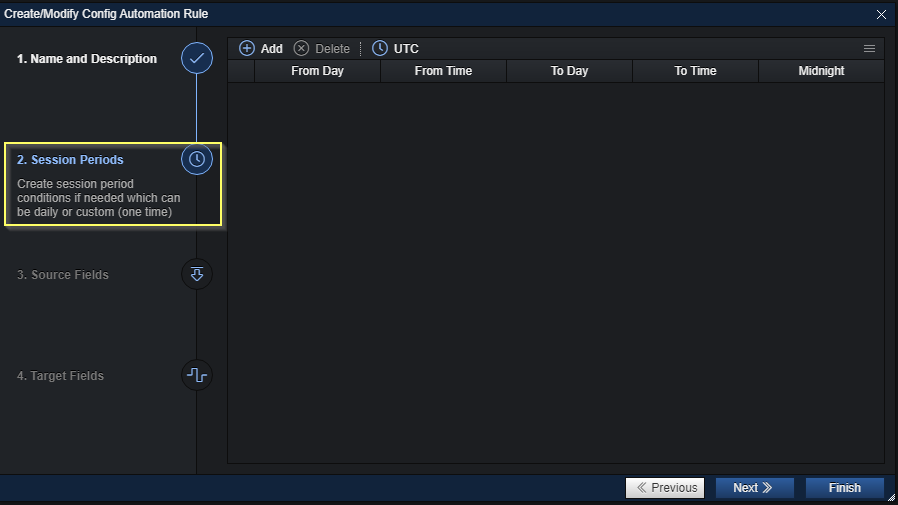
3. Set the up the trigger (IF condition) accordingly to which the system will be checking the system in order then to trigger the automation rule.
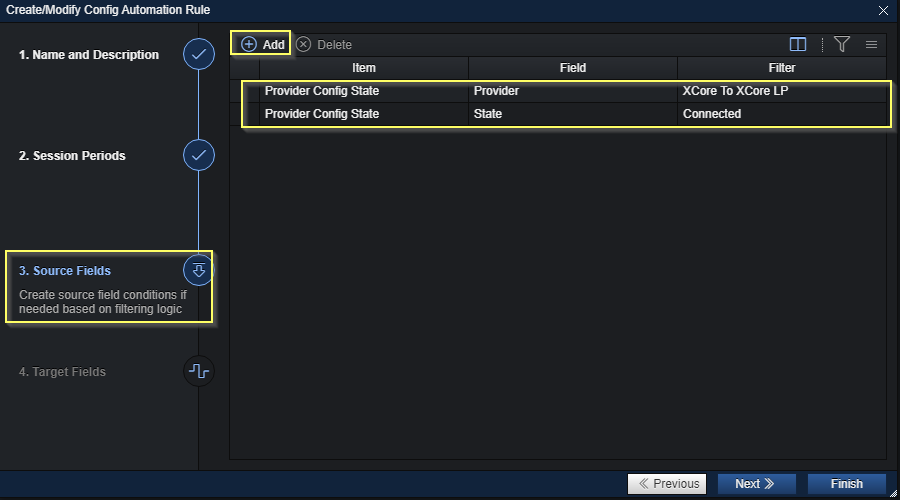
| Provider Config State | Provider | XCore To XCore LP | With this line the automation rule will be checking the state of the provider called “XCore To XCore LP” |
| Provider Config State | State | Connected | With this line the automation rule will be checking the state of the provider if it should be connected in order to trigger the rule |
4. Set the required actions in the Target Fields to be performed in the system if the automation rule is triggered.
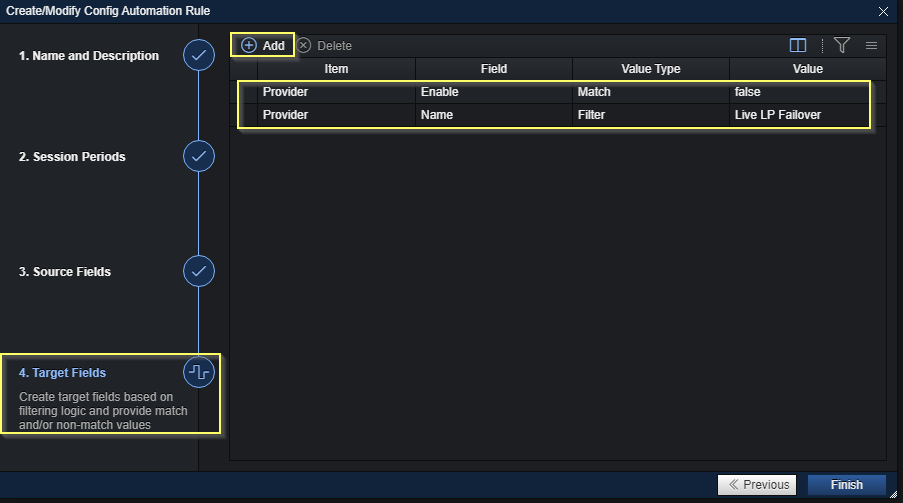
The targets on which changes the automation rule should perform are:
| Provider | Name | Filter | Live LP Failover | With this line the automation rule will filter in the Provider component for the specific provider called “Live LP Failover” |
| Provider | Enable | Match | false | With this line the automation rule will disable the previously filtered provider |
Finally press the Finish button to save the automation rule, please note that by default the automation rules are disabled when created, therefore you will need to enable the rule and save if you wish for the automation to become active and start monitoring the system.

Case 2: Failover LP (Assign Failover LP on the Main LQ Pool)
With this case scenario if the Main Liquidity Provider has been suddenly disconnected the Failover Liquidity Provider will be enabled in the system in order to continue streaming. In order for this case of the Failover Provider automation rule to work the prerequisite is to have the failover provider is enabled in the system always but without streaming to any client and to be assigned on the Main Liquidity Pool that is used for client which will replace the main provider assigned on the liquidity pool with the failover provider.
To set it up this rule the below please check the below steps:
- From the Config Automation component press Add button in order to start creating new automation rule and give accordingly a name and a description.
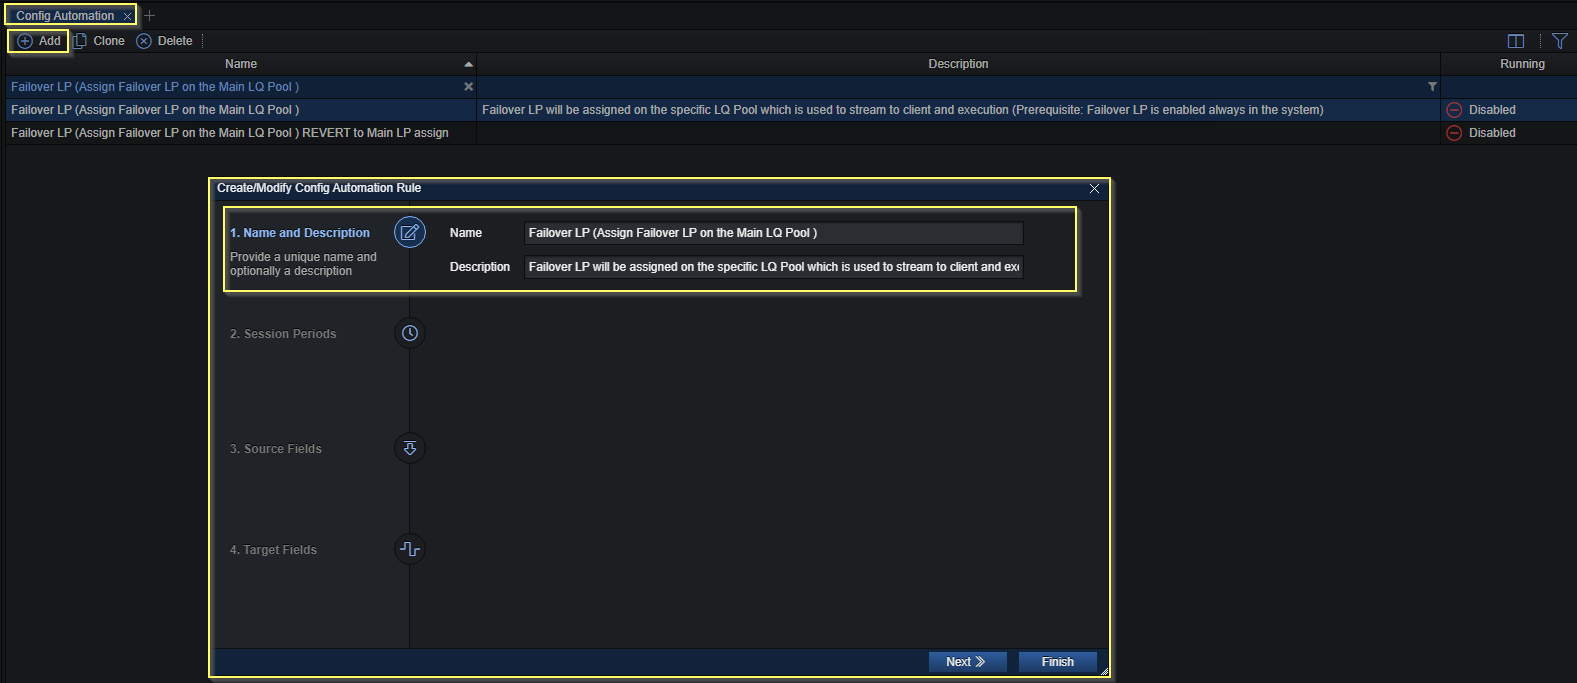
2. If needed you can define specific time session when the automation rule should be active to check the system and act accordingly on the automation rule configuration.
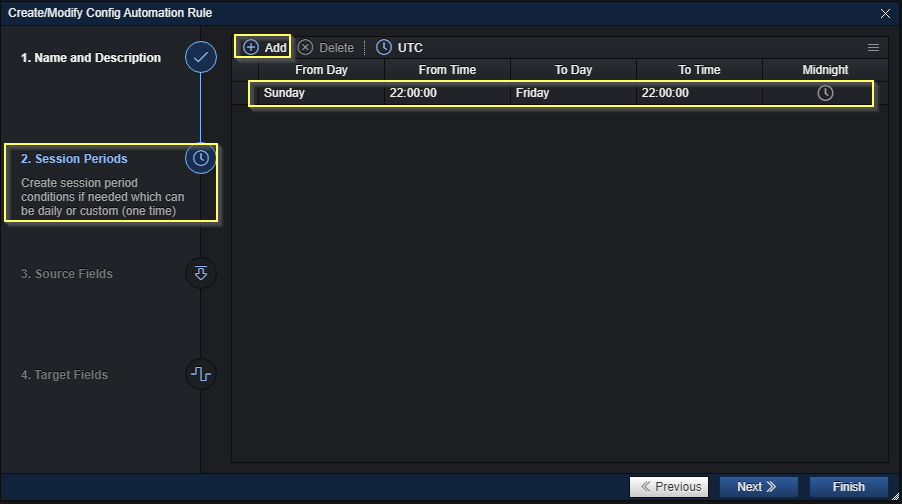
Note: If the time session left blank the automation rule will be checking all the time the system and then act accordingly with the automation rule configurations.
3. Set the conditions in the Source Fields (if what should happen in the system) upon which it will trigger the automation rule.
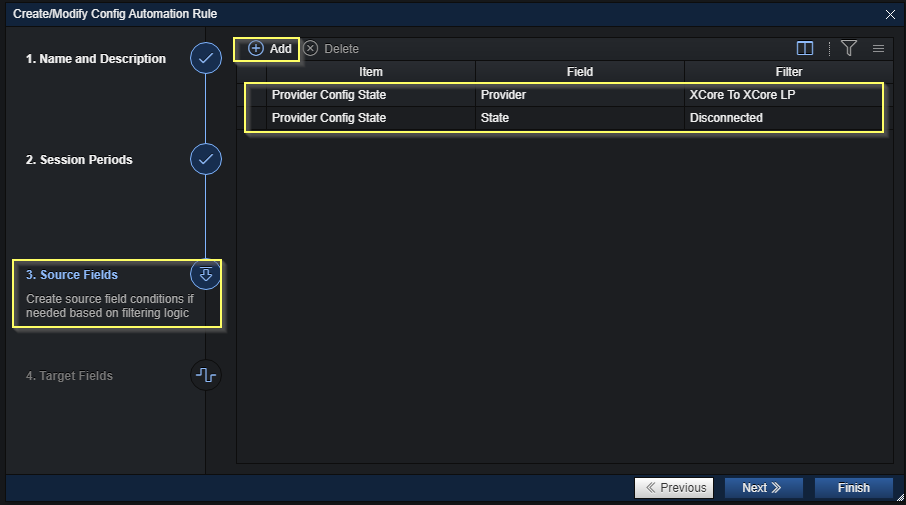
The IF conditions in this which acts as triggers are:
| Provider Config State | Provider | XCore To XCore LP | With this line the automation rule will be checking the state of the provider called “XCore To XCore LP” |
| Provider Config State | State | Disconnected | With this line the automation rule will be checking the state of the provider if it should be disconnected in order to trigger the rule |
4. Set the required actions in the Target Fields to be performed in the system if the automation rule is triggered.
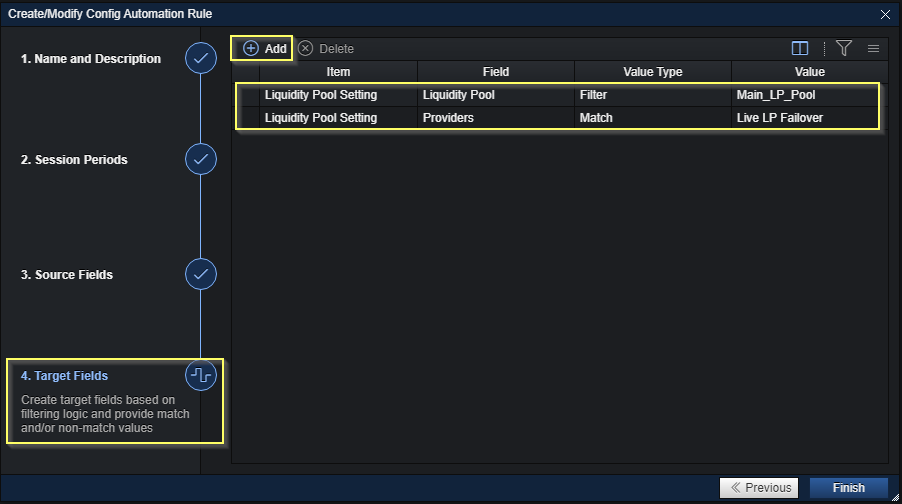
The targets on which changes the automation rule should perform are:
| Liquidity Pool Setting | Liquidity Pool | Filter | Main_LP_Pool | With this line the automation rule will filter in the Liquidity Pool Setting component for the specific liquidity pool called “Main_LP_Pool” |
| Liquidity Pool Setting | Primary | Match | Live LP Failover | With this line the automation rule will reassign on the previously filtered liquidity pool the Failover provider |
Finally press the Finish button to save the automation rule, please note that by default the automation rules are disabled when created, therefore you will need to enable the rule and save if you wish for the automation to become active and start monitoring the system.

Revert back automatically to the use of the Main Provider once it’s connected back.
Once our Main Provider is connected back again we would like to use again, to ensure this we have created a second automation rule which in case it detects that our Main Provider is connected back again in the system then it should reassign on the Main Liquidity Pool to use the Main Provider that we want to have.
- Created a new automation rule and give accordingly a name and a description.
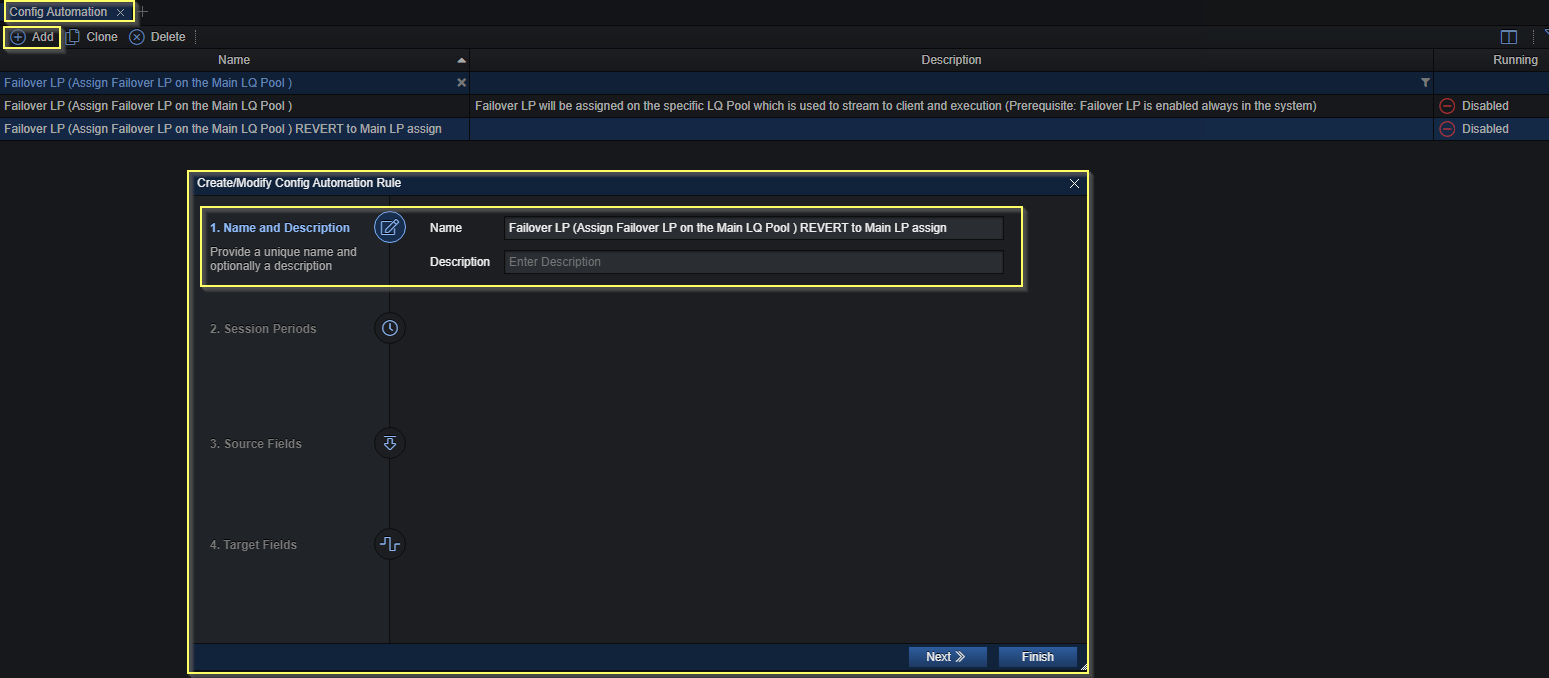
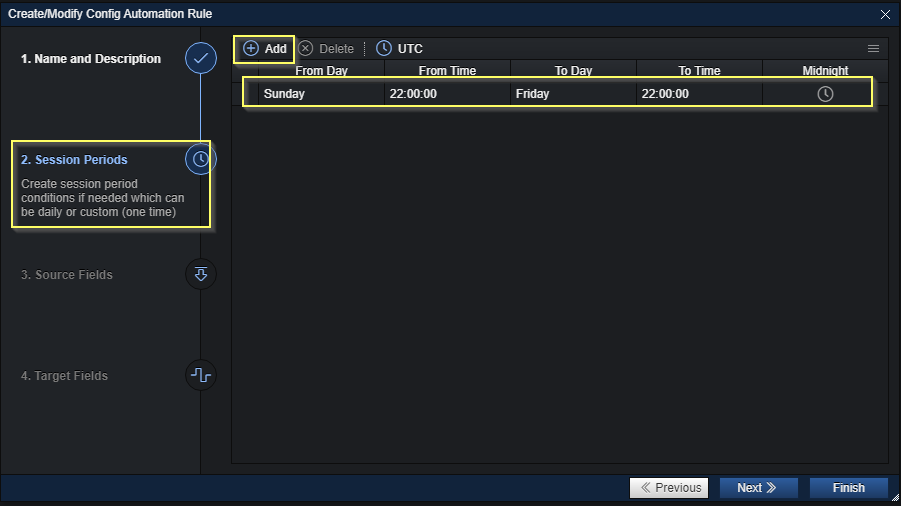
2. You can either set up a specific time session for the automation rule to define when it should be checking the system in order to act accordingly or left blank which will mean that it will be checking the system all the time
3. Set the up the trigger (IF condition) accordingly to which the system will be checking the system in order then to trigger the automation rule.
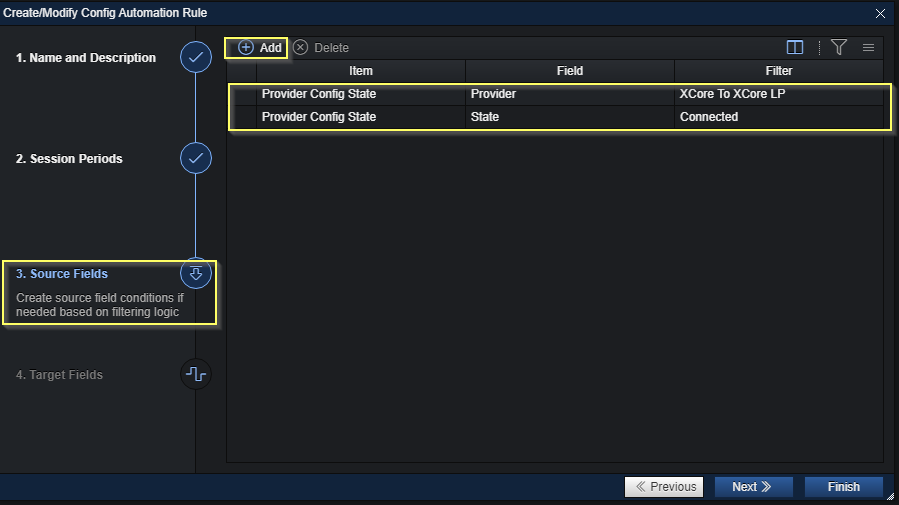
The IF conditions in this which acts as triggers are:
| Provider Config State | Provider | XCore To XCore LP | With this line the automation rule will be checking the state of the provider called “XCore To XCore LP” |
| Provider Config State | State | Connected | With this line the automation rule will be checking the state of the provider if it should be connected in order to trigger the rule |
4. Set the required actions in the Target Fields to be performed in the system if the automation rule is triggered.
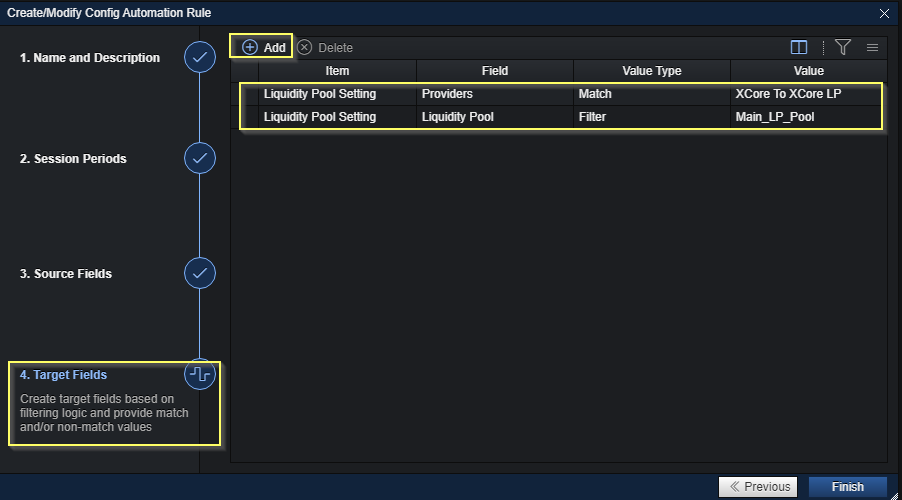
The targets on which changes the automation rule should perform are:
| Liquidity Pool Setting | Liquidity Pool | Filter | Main_LP_Pool | With this line the automation rule will filter in the Liquidity Pool setting component for the specific liquidity pool called “Main_LP_Pool” |
| Liquidity Pool Setting | Primary | Match | XCore To XCore LP | With this line the automation rule will reassign the previously filtered liquidity pool to have the provider “XCore To XCore LP” on the Main_LP_Pool |
Finally, press the Finish button to save the automation rule, please note that by default the automation rules are disabled when created, therefore you will need to enable the rule and save if you wish for the automation to become active and start monitoring the system.
Case 3: Failover LP (Failover LQ Pool on the stream and execution)
With this case scenario if the Main Liquidity Provider has been suddenly disconnected, the connector's stream and execution are switched to a liquidity pool that contains only the Failover Liquidity Provider. In order for this case of the Failover Provider automation rule to work the prerequisite is to have the failover provider enabled in the system at all times and assigned as the only provider of a separate liquidity pool (Failover_LP_Pool).
To set it up this rule the below please check the below steps:
- From the Config Automation component press Add button in order to start creating new automation rule and give it a name and a description.
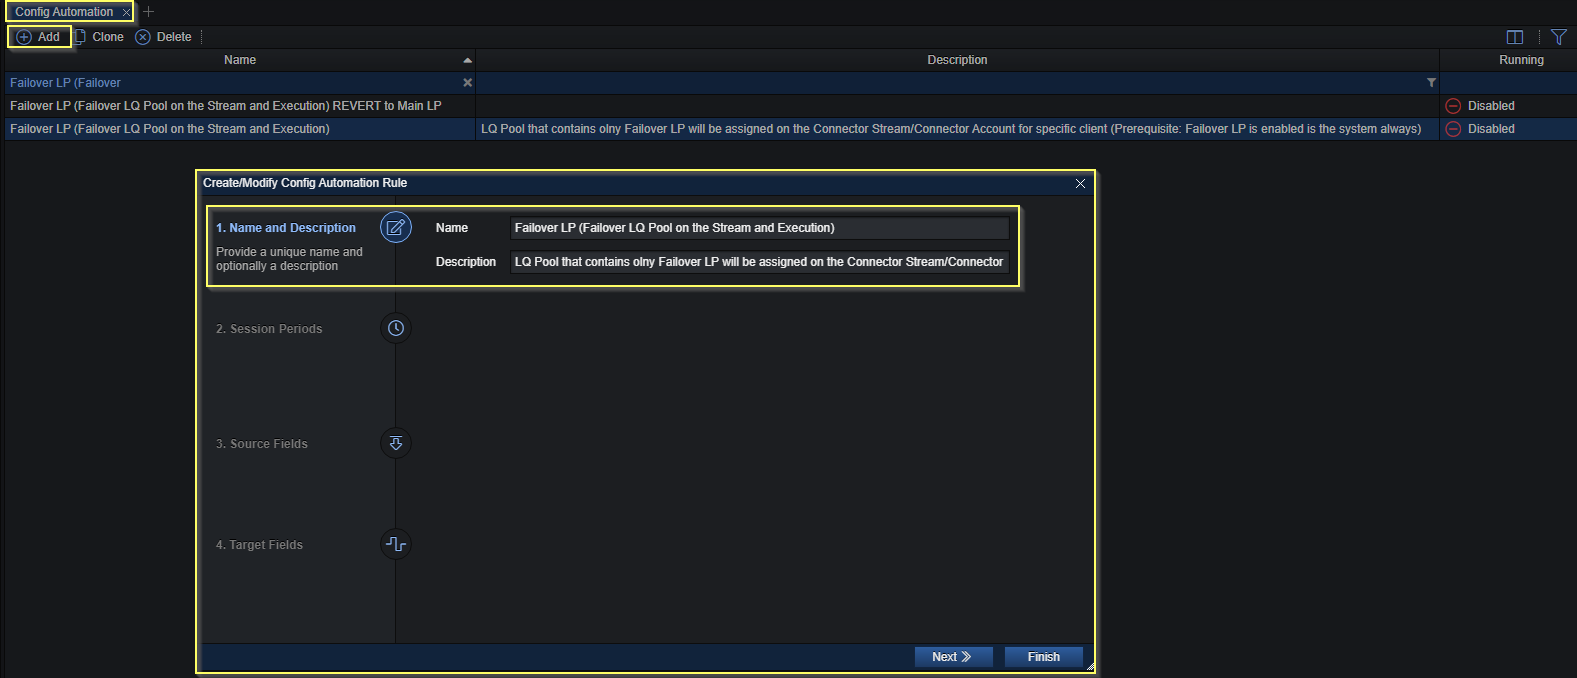
2. If needed you can define the time session when the automation rule should be active to check the system and act accordingly on the automation rule configuration.
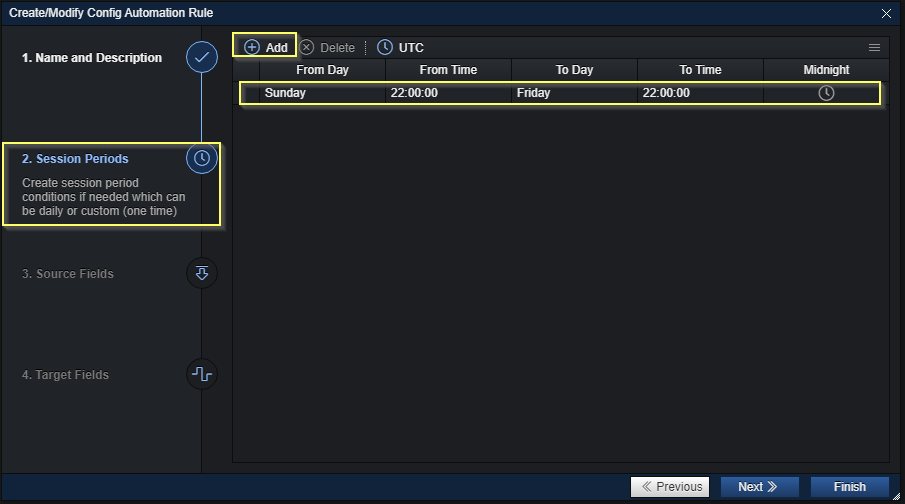
Note: If the time session left blank the automation rule will be checking all the time the system and then act accordingly with the automation rule configurations.
3.Set the conditions in the Source Fields (if what should happen in the system) upon which it will trigger the automation rule.
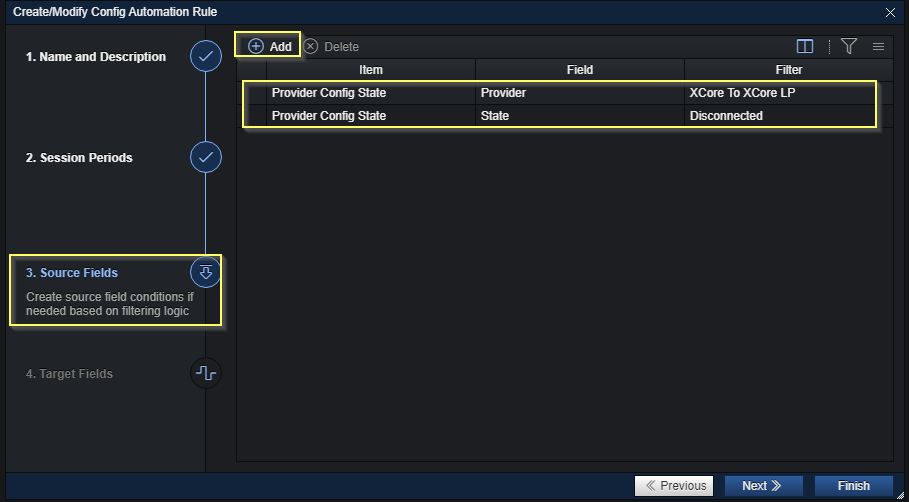
The IF conditions in this which acts as triggers are:
| Provider Config State | Provider | XCore To XCore LP | With this line the automation rule will be checking the state of the provider called “XCore To XCore LP” |
| Provider Config State | State | Disconnected | With this line the automation rule will be checking the state of the provider if it should be disconnected in order to trigger the rule |
4. Set the required actions in the Target Fields to be performed in the system if the automation rule is triggered.
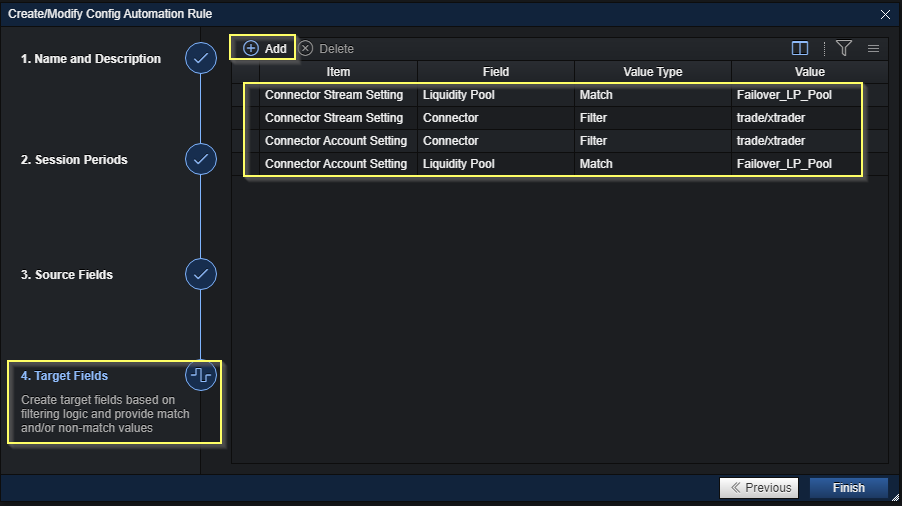
The targets on which changes the automation rule should perform are:
| Connector Stream Setting | Connector | Filter | trade/xtrader | With this line the automation rule will filter in the Connector Stream Setting component for the specific connector called “trade/xtrader” |
| Connector Stream Setting | Liquidity Pool | Match | Failover_LP_Pool | With this line the automation rule will reassign on the previously filtered connector stream component the liquidity pool called “Failover_LP_Pool” which contains the Failover provider |
| Connector Account Setting | Connector | Filter | trade/xtrader | With this line the automation rule will filter in the Connector Account Setting component for the specific connector called “trade/xtrader” |
| Connector Account Setting | Liquidity Pool | Match | Failover_LP_Pool | With this line the automation rule will reassign on the previously filtered connector account component the liquidity pool called “Failover_LP_Pool” which contains the Failover provider |
Finally press the Finish button to save the automation rule, please note that by default the automation rules are disabled when created, therefore you will need to enable the rule and save if you wish for the automation to become active and start monitoring the system.

Revert back automatically to the use of the Main Provider once it’s connected back.
Once our Main Provider is connected back again we would like to use again, to ensure this we have created a second automation rule which in case it detects that our Main Provider is connected back again in the system then it should reassign on the Main Liquidity Pool to use the Main Provider that we want to have.
- Created a new automation rule and give accordingly a name and a description.
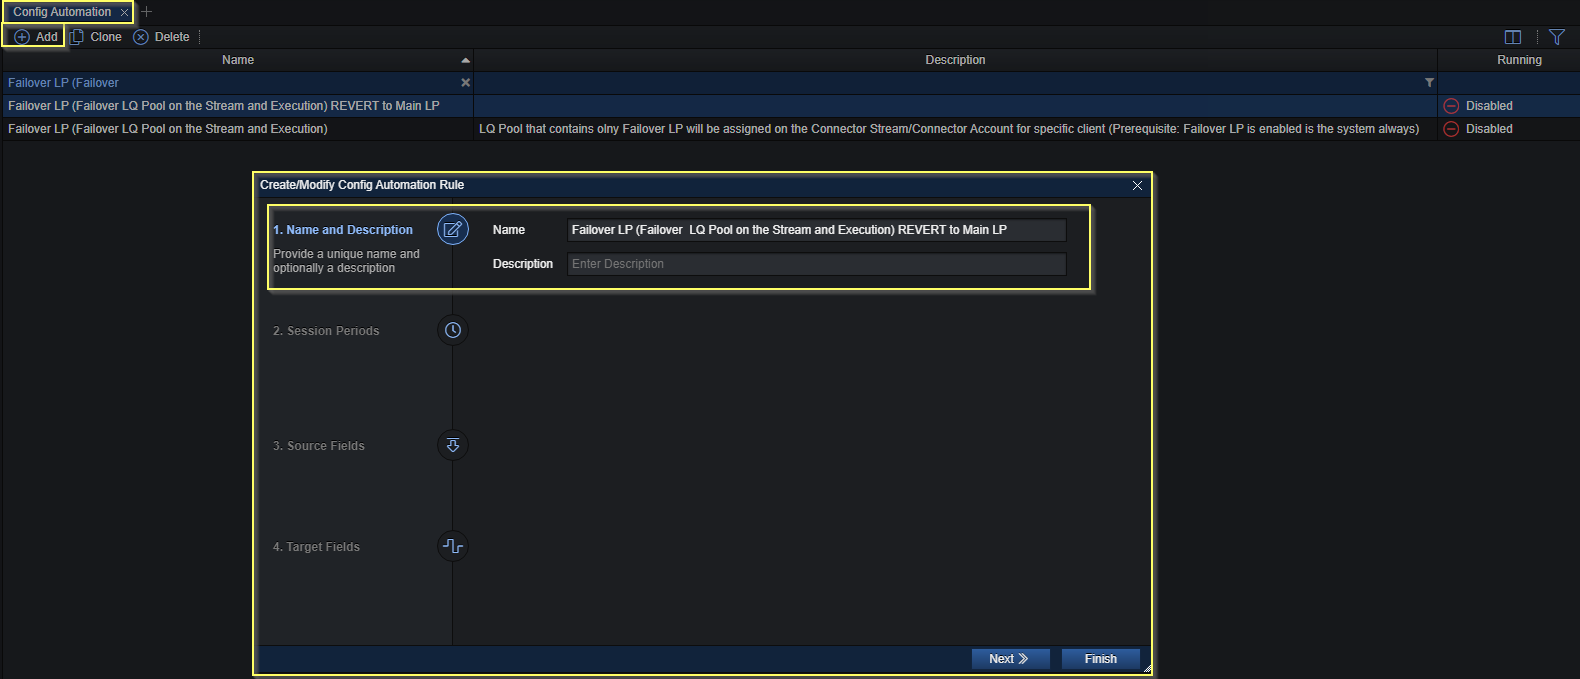
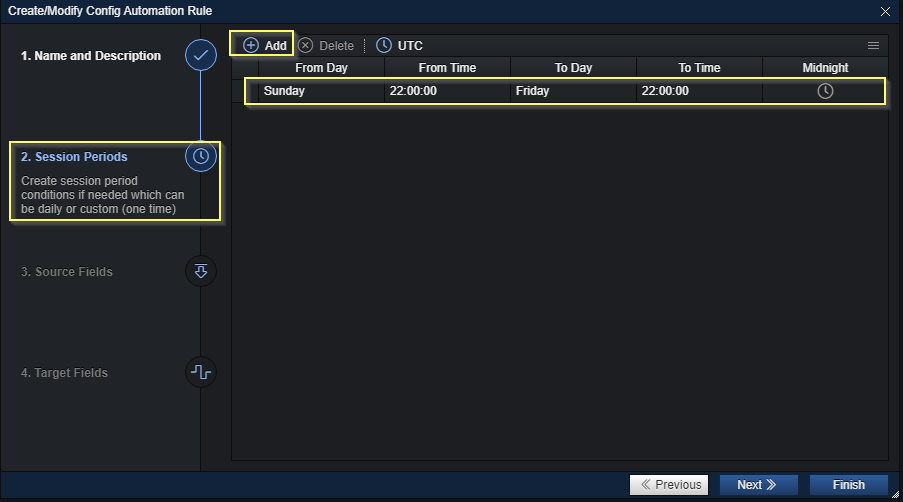
2. You can either set up a specific time session for the automation rule to define when it should be checking the system in order to act accordingly or left blank which will mean that it will be checking the system all the time.
3. Set the up the trigger (IF condition) accordingly to which the system will be checking the system in order then to trigger the automation rule.
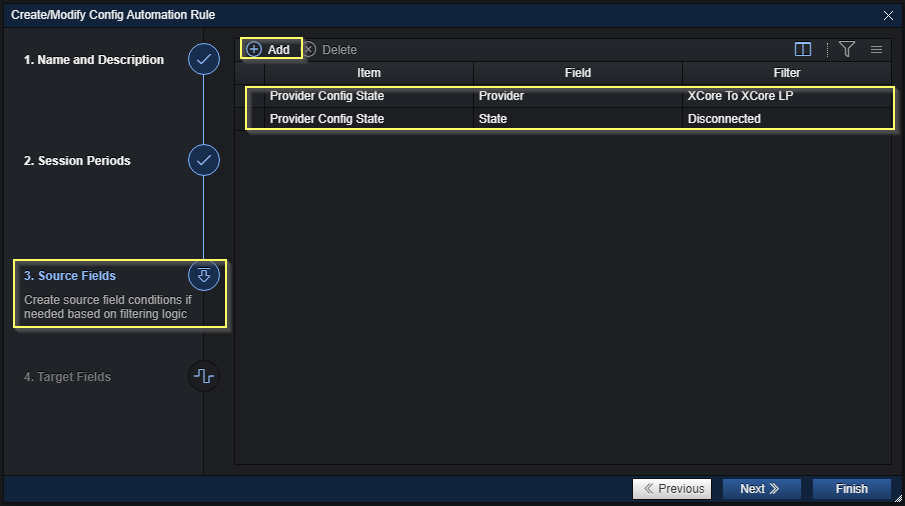
The IF conditions in this which acts as triggers are:
| Provider Config State | Provider | XCore To XCore LP | With this line the automation rule will be checking the state of the provider called “XCore To XCore LP” |
| Provider Config State | State | Connected | With this line the automation rule will be checking the state of the provider if it should be connected in order to trigger the rule |
4. Set the required actions in the Target Fields to be performed in the system if the automation rule is triggered.
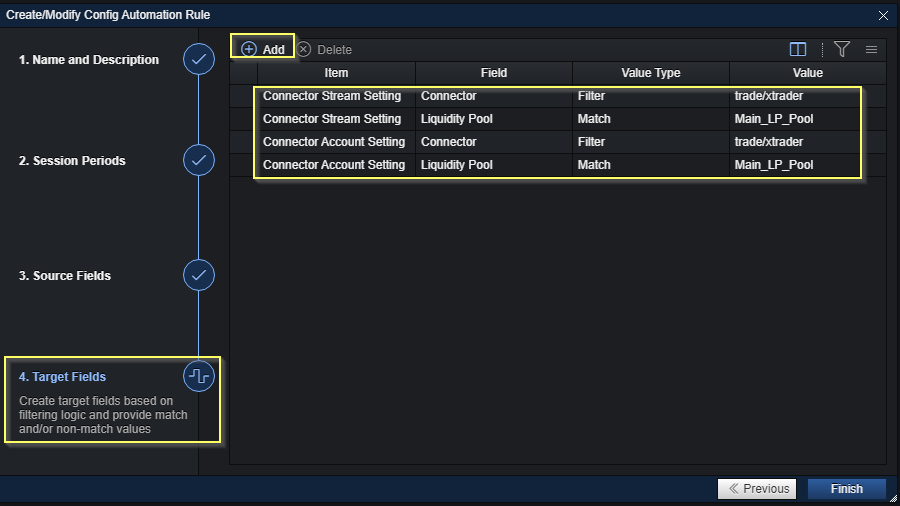
The targets on which changes the automation rule should perform are:
| Connector Stream Setting | Connector | Filter | trade/xtrader | With this line the automation rule will filter in the Connector Stream Setting component for the specific connector called “trade/xtrader” |
| Connector Stream Setting | Liquidity Pool | Match | Main_LP_Pool | With this line the automation rule will reassign on the previously filtered connector stream component the liquidity pool called “Main_LP_Pool” which contains the Main provider |
| Connector Account Setting | Connector | Filter | trade/xtrader | With this line the automation rule will filter in the Connector Account Setting component for the specific connector called “trade/xtrader” |
| Connector Account Setting | Liquidity Pool | Match | Main_LP_Pool | With this line the automation rule will reassign on the previously filtered connector account component the liquidity pool called “Main_LP_Pool” which contains the Main provider |
Finally press the Finish button to save the automation rule, please note that by default the automation rules are disabled when created, therefore you will need to enable the rule and save if you wish for the automation to become active and start monitoring the system.

New rules will always be disabled by default. Always ensure the rule is Enabled for the automation to occur!
How to Schedule Markups and Automate Spread Configurations
The Config Automation component can be configured to automatically switch between markup profiles based on predefined conditions. This means that client markups and execution settings for orders can be automatically varied at certain times of the day.
For example, the system can automatically increase markups during market open and market close or during a specific planned news event.
Alternatively, users may wish to improve execution for clients during market open/close by absorbing slippage and hence choose to automatically assign “ACCEPT” spread_exec at specific times.
It is advised to have multiple markup profiles which the system can automatically switch between rather than automating changes to specific fields in current profiles.
The below guide will explain how to automatically switch between markup profiles based on predefined time periods.
How to Automate Scheduled Markups
Add New Rule
1. From the Config Automation component, click “Add”
2. Specify a Name for the new rule and add a description about what the automation rule will do
3. Click “Next”
Define Sessions
4. Click “Add”
5. Define the times that the automation should run. In this case the markup profile will be changed at FX market open/close
6. Click “Save”
7. Click “Next”
Define the Conditions Which Should Cause the Change
In this example, the only condition is the time period already defined in steps 4-6. If you wish to define filters for further conditions you can do so at this stage. For more information on defining “source fields”.
Define the markup profile to be assigned
8. Click “Add”
9. Under Value Type select “Match” to define the markup profile which should be assigned at the time period specified in step 5. You should do this for both the Connector Stream (pricing) and Connector Account (trading)
10. Click “Add”
11. Under Value Type select “Non-match” to define the profile to revert to if the time is not within the period specified in step 5. Again, you will need to do this for both the Connector Stream (pricing) and Connector Account (trading)
12. Click “Save”
13. Click “Finish”
How to set Automated Holiday Session for symbols
The holiday sessions can be set in advance in the XCore which would apply without manual interaction of humans by using the Configuration Automation component for controlling the operating time of a financial instrument (symbols) on certain minutes, hours, days.
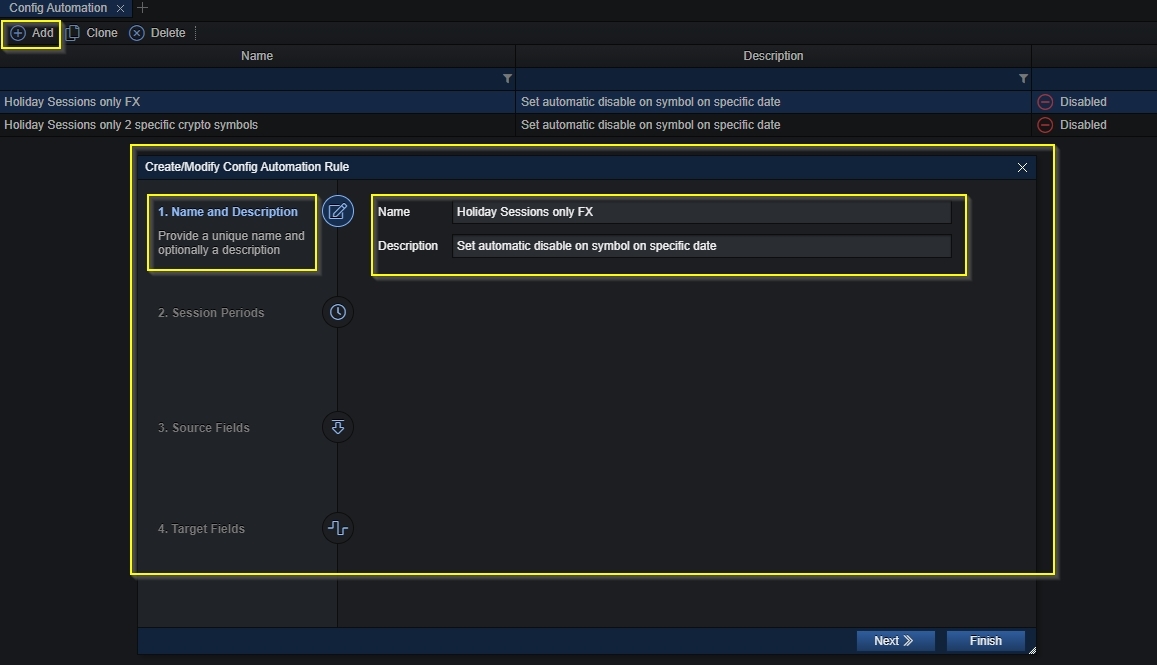
In order to achieve this first head on to the Configuration Automation component and press Add which will open the wizard to create a new Automated rule, decide a name for the automation rule and description if needed.
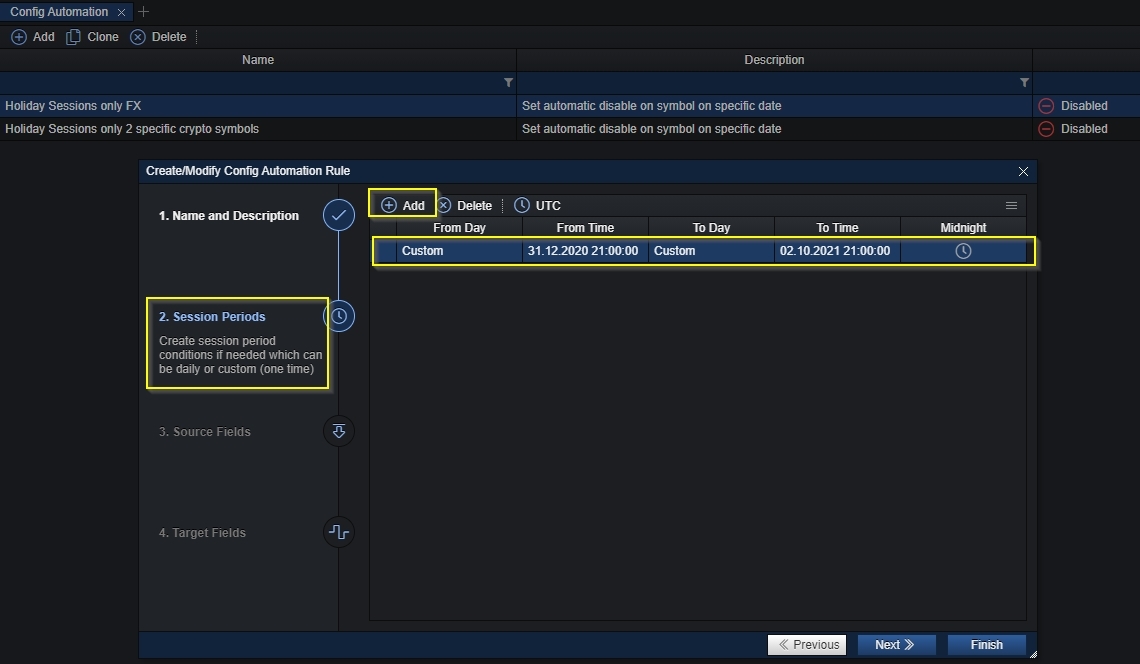
The next step needs to define the time (sessions) when the automation rule should apply in the XCore system. in other words during the defined time period the symbol (s) should be inactive for pricing and trading.
The Source Fields step can be ignored for the Automatic Holiday Sessions as it does not require a trigger but only defining the time sessions for when you wish to disable the symbols in the XCore.
Last you need to set the end result you wish to apply on specific settings (component) such as disable the symbols at the time sessions configured in one of the previous steps and then automatically enable them once the time sessions configured has passed:
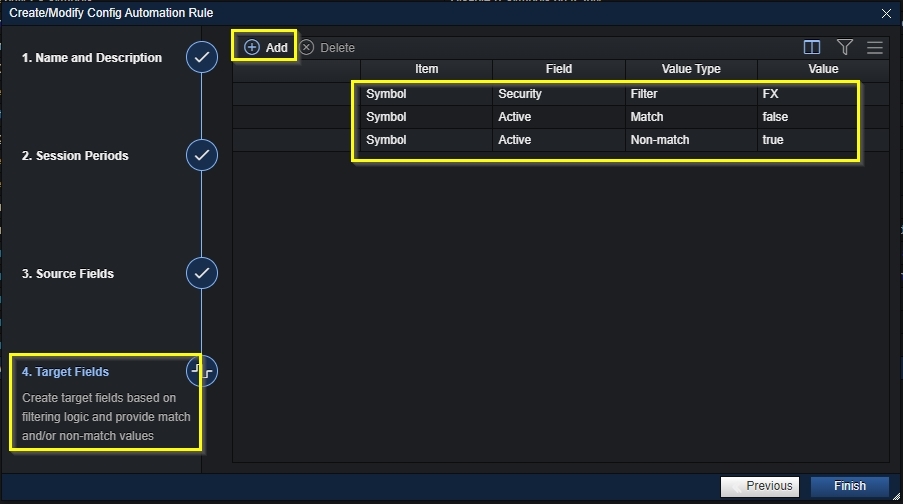
Note: The Non-match specification is needed in order to enable the symbols automatically once the time sessions defined has ended
In order for the rule start working don’t forget to enable and save the specific rule that has been configured.

How to automatically roll futures contracts
By using the config automation tool of the XCore it is possible to configure automatically expiring products such as CFDs that follow future contracts.
In order to use the automation rules for expiring products as a prerequisite to successfully set it you must have already created the generic symbols and they are active in the XCore.
For example, you already have created the generic symbols:
- WTI.XX
- WTI.YY
Now by configuring properly the automation rule you are able to set for future the symbols when the contract will be changed to change automatically the in the XCore the configuration required to successfully subscribe.
From the Configuration Automation component press Add button which will open the wizard to create new automation rule and add the name for the rule and a description.
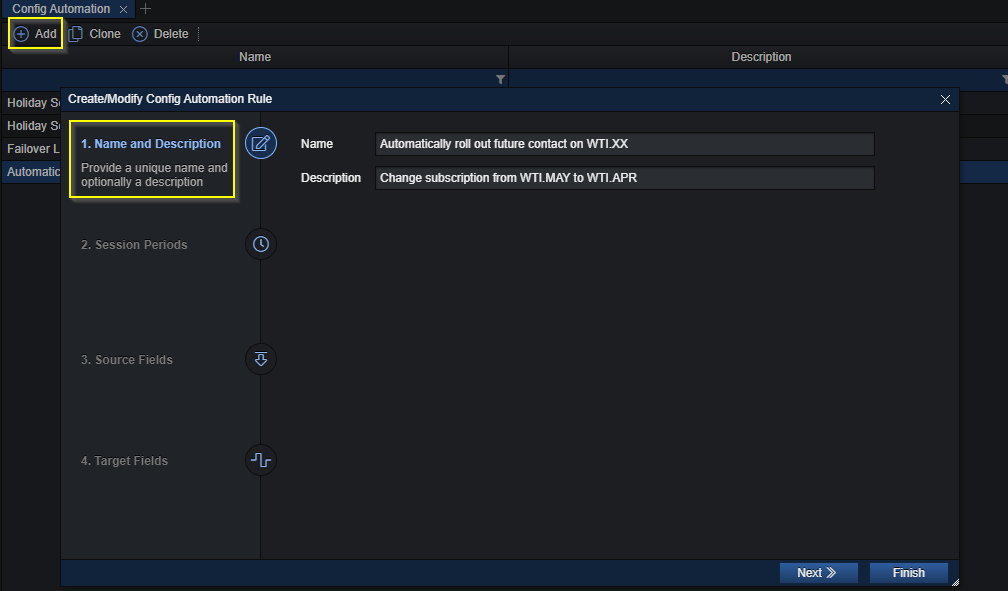
In the next step of Session Periods will need to define when the rule should apply/working in the XCore.
For example for the expiry product WTI.XX which we need to be applied on 01/04/21 and will be an active contract until the end of month on 30/04/21 the session period will be set as: Custom 01.04.2021 12:40:00 Custom 30.04.2021 22:00:00
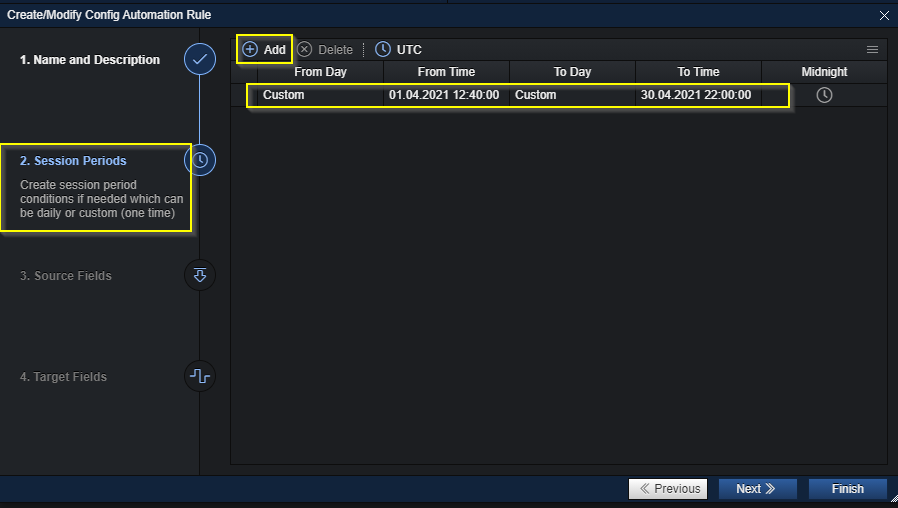
Note: The time session configuration is done in UTC time therefore you will need to consider different timezones.
The Source Fields part can be skipped since there is no action needed to be recorded as a trigger to make the required change because the trigger for expiry products would be the time session defined in the previous step.
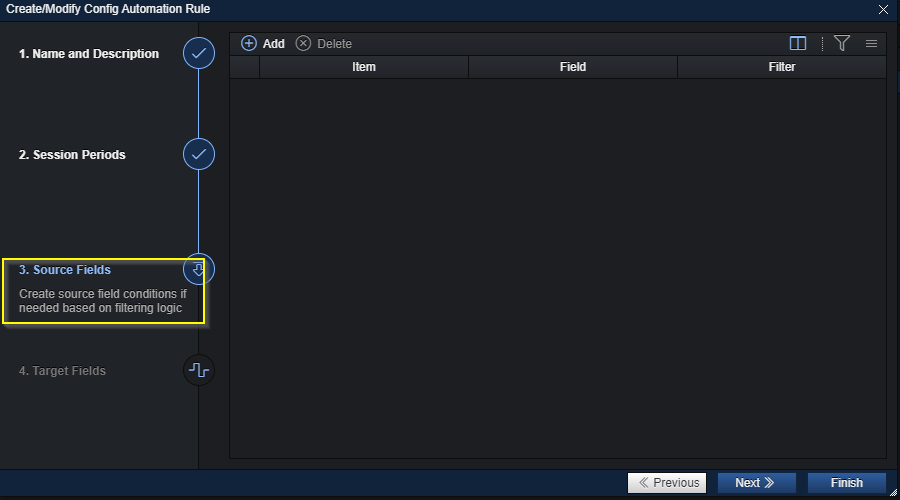
Finally in the Target Field step need to define the end result which we wish to be implemented in the XCore. For the expiry products the required changes would need to be done on the Provider Setting component and Connector Stream setting components in case you have also made changes on the symbol naming in the MT4/MT5 System.
We filter out with the Provider Setting component for the requested liquidity provider and symbol to make a change (Match) to match how it should be set accordingly with the contract name provided by the Liquidity Provider.
Note: This action will ensure the subscription between XCore with the Liquidity Provider on the new contract.
We filter out with the Connector Stream Setting component for the Connector/Connector Stream/Symbol to make a change (Match) to match how it should accordingly to the naming on the MT4/MT5 Systems.
Note: This action will ensure subscription between XCore and MT4/MT5 System on the new contract.
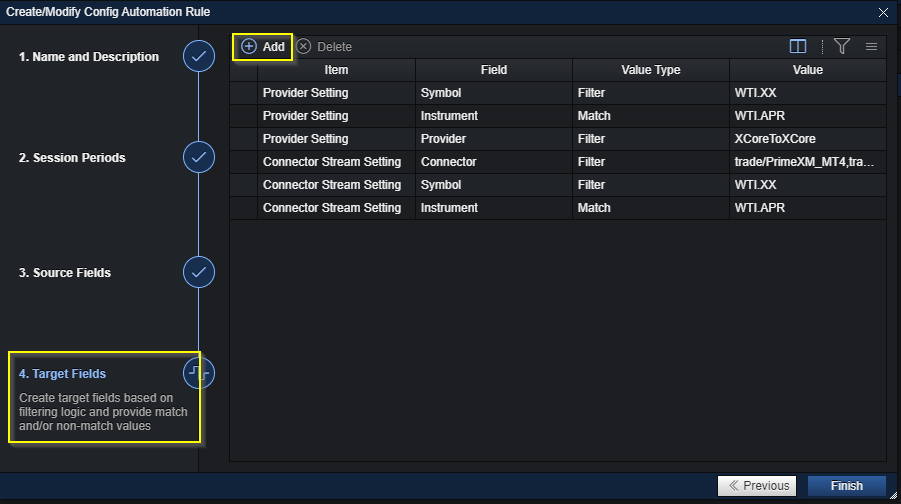
Note: It is advisable always to check the subscription of the symbol was successful as it might require either Feeder Restart on MT4/MT5 side or Provider refresh on the XCore side.
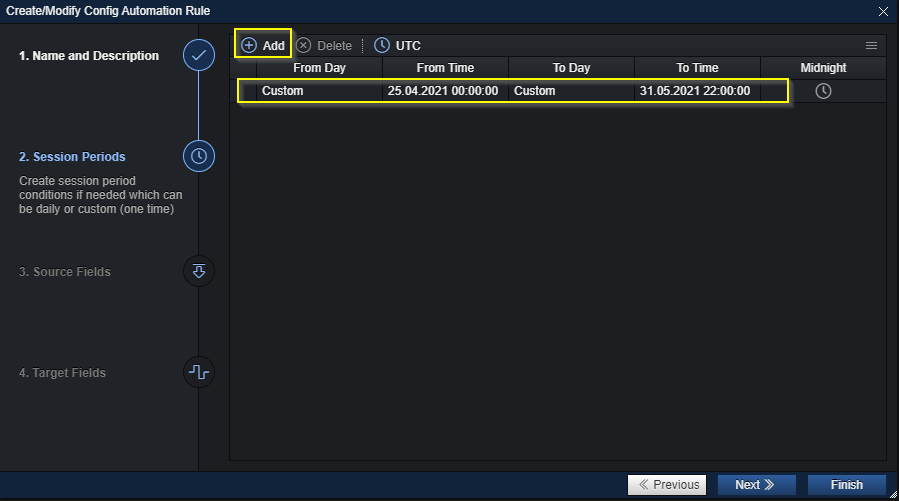
Adding to the above will consider the situation of having 1 week prior to ending the current contact (WTI.APR) on the symbol (WTI.XX ) that was enabled before to enable the future contract (WTI.MAY) on the symbol (WTI.YY) that way both contracts will be active at the same time for a period of one week prior to the current contract ends fully.
By creating a second automation rule for the symbol WTI.YY
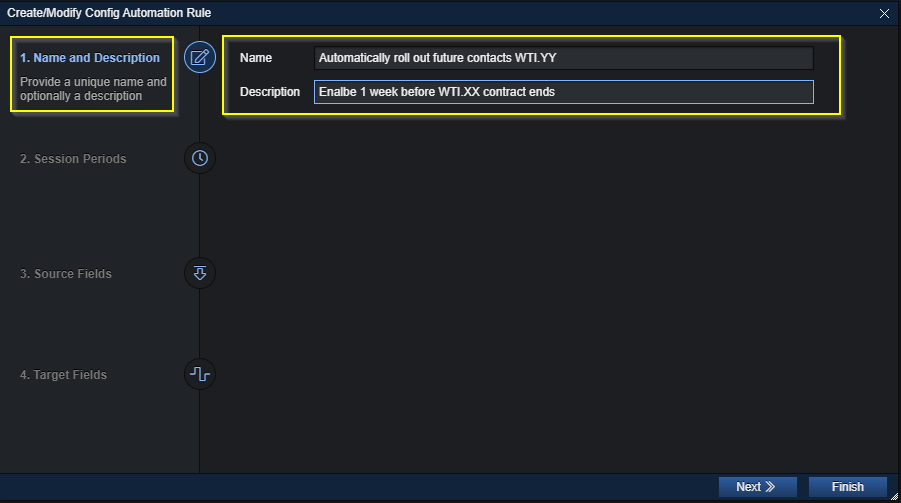
we are setting the time session when the configuration to the specific symbol should be active, which is 1 week prior to the current contract to end on the symbol WTI.XX.
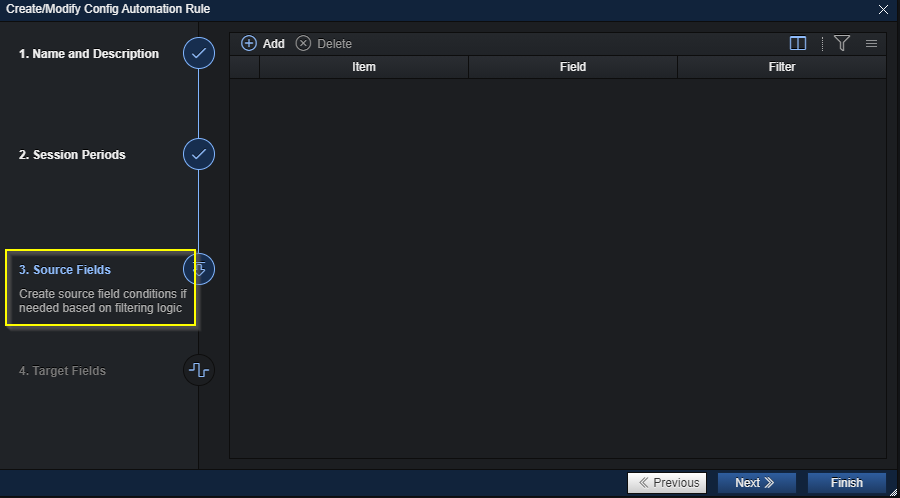
The Source Field step again is left empty as the trigger for expiry product configuration is the Time Session when it should be active in the XCore.
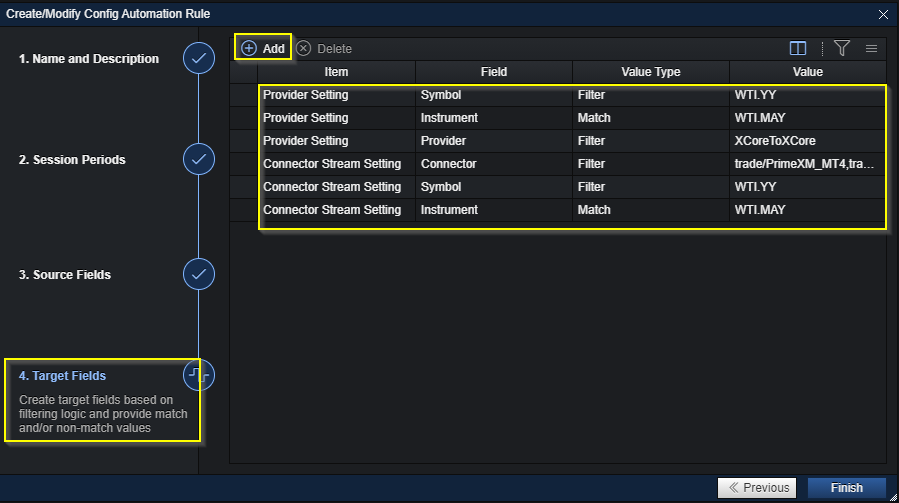
Finally, in the Target Field step we configure the configuration that should apply on the Provider Setting and Connector Stream setting component for the symbol WTI.YY to be configured with the new contract of WTI.MAY accordingly.
Configurations Which Require an XCore Restart
The XCore Portal allows users a great amount of flexibility to make many configuration changes to the system live, however, there are some changes which cannot be made in real-time. Such changes will need to be made from the Pending Config component and will require an “apply and restart” to take effect.
WARNING: Please take care when restarting your XCore as it will cause a brief disruption to pricing and trading. XCore owners are always advised to perform XCore restarts outside of market hours or during times of low trading activity.
Please see below for the configurations in each component which can ONLY be performed via the Pending Config component:
Security & Symbol
| Component | Operation |
|---|---|
| Security | Add/Delete |
| Symbol | Add/Delete |
| Symbol | Edit “Order Size Step” value |
| Symbol | Edit “Digits” (pip) value |
Provider
| Component | Operation |
|---|---|
| Provider | Add/Delete |
| Provider Setting | Edit Sessions |
| Provider Setting | Edit Volumes |
| Provider Setting | Edit Depth |
| Provider Setting | Enable/Disable “Consume” |
| Provider Setting | Enable/Disable Sweep |
| Provider Setting | Edit Timeout Warn value |
| Provider Setting | Edit Timeout Error value |
| Provider Setting | Edit Timeout Kill value |
| Provider Config | Enable/Disable Provider pricing/trading session |
| Provider Scaling Setting | Edit Scaling Factors |
Liquidity Pool
| Component | Operation |
|---|---|
| Liquidity Pool | Add/Delete |
Liquidity Profile
| Component | Operation |
|---|---|
| Liquidity Profile | Add/Delete |
| Liquidity Profile Setting | Add new Layers for Layered Markups |
Connector
| Component | Operation |
|---|---|
| Connector | Add/ Delete |
| Connector Config | Enable/Disable pricing or trading sessions |
| Connector Config Setting | Edit Password for pricing/trading session |
| Connector Stream | Add/ Delete |
| Connector Stream Setting | Edit Sessions |
| Connector Stream Setting | Edit Layers for constructing the liquidity book |
| Connector Stream Setting | Edit Lq Lock for artificial liquidity |
| Connector Stream Setting | Edit Lq Boost for artificial liquidity |
| Connector Account | Add/ Delete |
| Connector Account | Edit Currency |
| Connector Account | Edit Trade Limit |
| Connector Account | Edit Trade Span |
| Connector Account | Edit Margin |
| Connector Account | Edit Risk |
| Connector Account | Edit Broker |
| Connector Account Setting | Edit Sessions |
| Connector Account Setting | Edit “Layers” for Layered Markups |
Account
| Component | Operation |
|---|---|
| Account | Add / Delete |
| Account | Update Account Settings (change leverage profile, stop-out settings etc) |
| Account Connectors | Add/Delete |
| Account Connectors | Enable/ Disable |
| Account Connectors | Update/ Configure |
| Account Providers | Add / Delete |
| Account Providers | Update/Configure |
| Account Profile Leverage Currency | Add/ Delete |
| Account Profile Leverage Symbol | Add/ Delete |
| Account Profile Limit Currency | Add/ Delete |
| Account Profile Limit Symbol | Add/ Delete |
| Account Profile Netting | Add/ Delete |
| Account Profile Netting Setting | Enable/ Disable |
| Account Profile Settlement | Add/ Delete |
| Account Profile Settlement Setting | Update Settlement times |
| Account Profile Swap | Add/ Delete |
| Account Source | Add/ Delete |
| Commission Profile | Add/ Delete |
| Commission Profile Setting | Update Type |
| Commission Connectors | Assign Commissions to client connectors |
Additional Settings
| Component | Operation |
|---|---|
| Giveup | Add/ Delete / Edit |
| Dealer Link | Add/ Delete / Edit |
| Dealer Trade | Add/ Delete / Edit |
| Filter | Add/ Delete / Edit |