PrimeXM MT5 Gateway
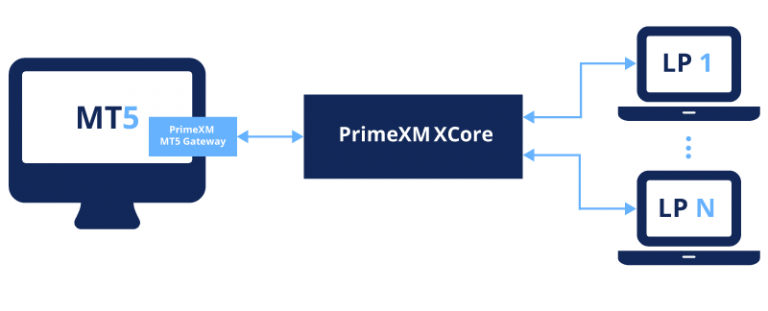
The PrimeXM MT5 Gateway routes MT5 order requests to XCore for execution and reports execution confirmations back to MT5.
The Gateway supports parallel processing and synchronization between MT5 and XCore. Execution rules can be configured in real time for individual MT5 accounts, symbols, and order types without restarting the server.
How to install the MT5 Gateway
video=896546700
How to update the MT5 Gateway
video=860182395
Setup/Update
Installation
To install the PrimeXM MT5 Gateway, you will need to follow the steps outlined below:
- (1) Download the latest PXMGateway64.exe file available in the Download and Changelog section of this page. Read the changelog for changes that might affect your current configuration.
- (2) Stop the MetaTrader 5 History Server from Windows Services (service name: MetaTrader 5 History Server service).
- (3) Navigate to the Gateway folder of the MetaTrader 5 History Server (e.g. D:\MetaTrader 5 Platform\History\Gateway).
- (4) Create a new folder under the Gateway folder of the MetaTrader 5 History Server (e.g. D:\MetaTrader 5 Platform\History\Gateway\PXMGateway64).
- (5) Copy the PXMGateway64.exe file needed for the installation into the Gateway folder of the MetaTrader 5 History Server (e.g. D:\MetaTrader 5 Platform\History\Gateway\PXMGateway64\PXMGateway64.exe).
- (6) Start the MetaTrader 5 History Server from Windows Services (service name: MetaTrader 5 History Server service).
- (7) if you have a fail-over/backup MT5 server, for good measure, manually copy over the PXMGateway64.exe from the Gateway folder of the primary MetaTrader 5 server.
Configuration
To configure the PrimeXM MT5 Gateway, you will need to follow the steps outlined below:
-
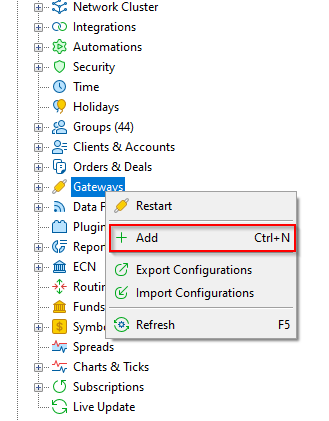
(1) Log into the MT5 Administrator under the Gateway Tab, right click and select + Add to add a new gateway entry:
-
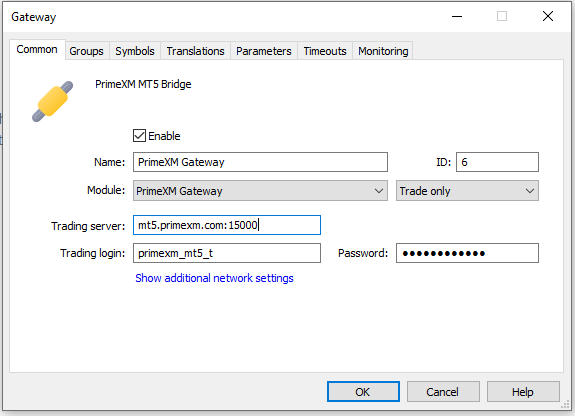
(2) Configure the Common settings of the Gateway as per below example:
- Name: PrimeXMGateway
- Module: PXMGateway64 (Trade Only)
- ID: Automatically set by the MT5 Admin
- Trading Server:
:<trading port> (e.g. xcorename.primexm.com:15000) - Trading Login: Trading session login obtained from the MT5 Connector Config Settings component of the XCore
- Password : Trading session password obtained from the MT5 Connector Config Settings component of the XCore
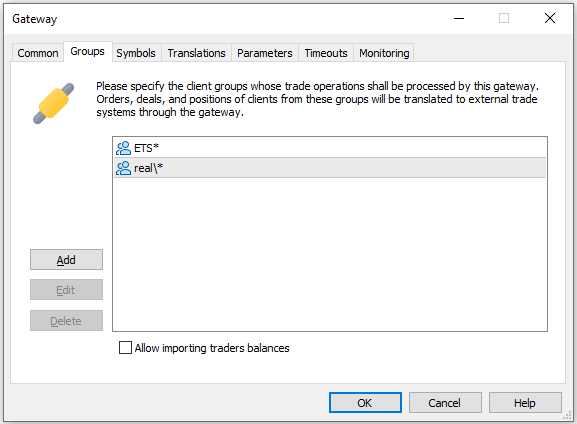
- (3) Configure the Groups settings of the Gateway by specifying the groups or group path(s) to be intercepted and processed by the PrimeXM Gateway:
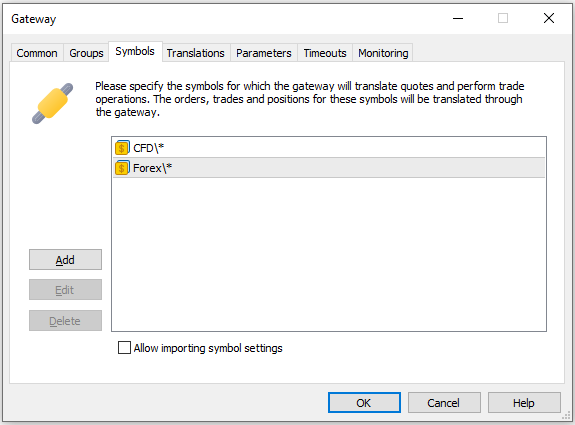
- (4) Configure the Symbol settings of the Gateway by specifying the symbols or symbol path(s) which should be processed by PXM Gateway:
- (5) The Translations tab is for MT5 markups and should not be used for PrimeXM MT5 Gateway.
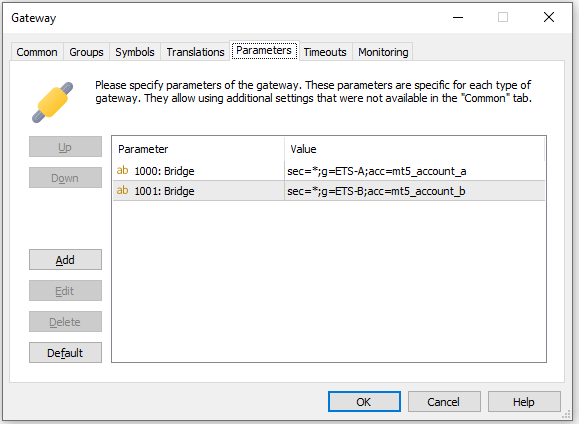
- (6) Configure the Parameters settings of the Gateway following the Routing Rules, Execution Rules and Special Gateway Rules.
- It is important to get familiar with these rules in order to understand what kind of syntax is allowed with PrimeXM Gateway v2.x
Important:
If there are any errors in the syntax while updating the PrimeXM MT5 Gateway v.2.x configuration Parameters, the Gateway will remain on the old configuration Parameters until the updated configuration Parameters are error-free. It is therefore very important to always check this using the XCore Portal, the XCore MT5 Connector’s trading logs, for Errors when making changes to the MT5 Gateway Parameters.
Routing Configuration
To configure the MT5 Routing Rules for the PrimeXM MT5 Gateway, you will need to follow the steps outlined below:
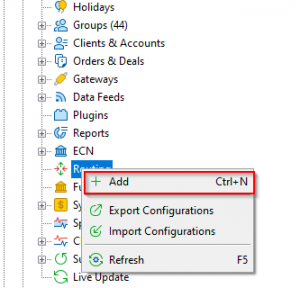
- (1) Log into the MT5 Administrator under the Routing Tab, then right-click and select + Add to add a new routing entry:
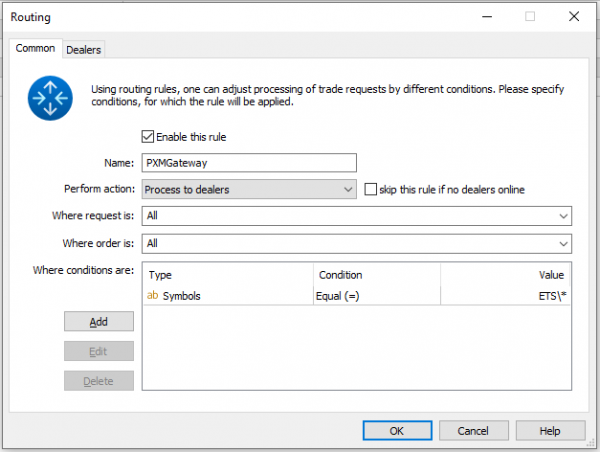
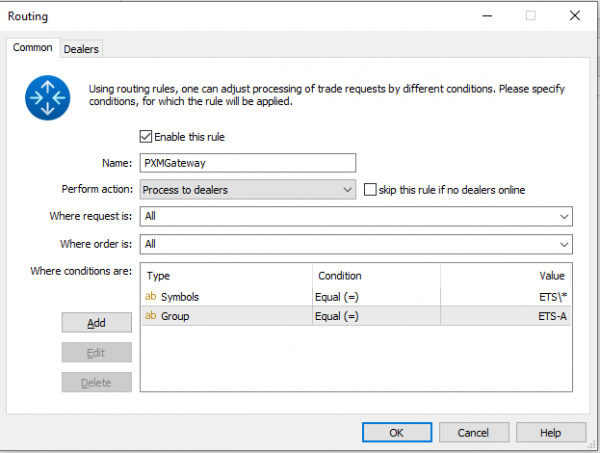
- (2) Configure the Common settings of the Routing as per the below example:
- Name: PXMGateway
- Perform Actions: Process to dealers
- Where request is: All
- Where order is: All
- Where conditions are: i.e Type: Symbols – Condition: Equal – Value: Symbols path
Note: No more than one Routing condition of a specific Type (e.g. Symbols, Groups, etc) can be configured under a single Routing Rule. If several Routing conditions of the same type need to be defined, then this should be achieved by configuring two distinct Routing Rules.
i.e to route orders over the PrimeXM Gateway for two Client Groups, PXM-A\* and PXM-B\*, then two Routing Rules have to be created:
- one Routing Rule with conditions set to: Type: Client Group – Condition: Equal – Value: PXM-A\*
- one Routing Rule with conditions set to: Type: Client Group – Condition: Equal – Value: PXM-B\*
Note: Several Routing conditions can be configured under a single Routing Rule, only if each Routing condition is of a different type.
i.e to route orders over the PrimeXM Gateway for orders executed only from Client Group PXM-A\* and Symbols Forex\* , then a single Routing Rules can include both conditions:
- one Routing condition set to: Type: Client Group – Condition: Equal – Value: PXM-A\*
- one Routing condition set to: Type: Symbols – Condition: Equal – Value: Forex\*
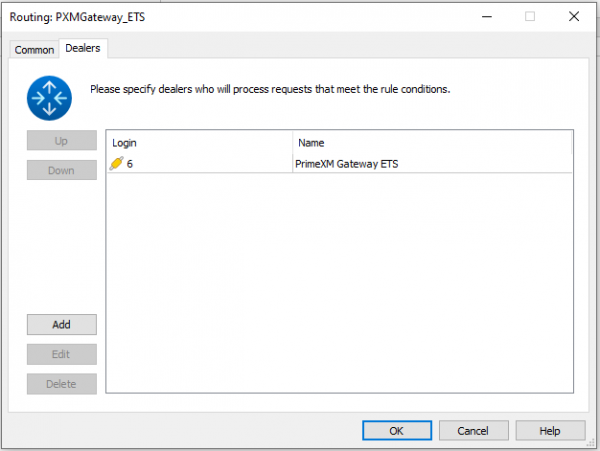
- (3) Configure the Dealers settings of the Routing by specifying the login of the PrimeXM Gateway to which orders satisfying the previously defined routing conditions would be routed. You can find this login ID from your recently created Gateway.
Connectivity & Verification
To check if the PrimeXM MT5 Gateway has successfully connected to the XCore environment, you will need to follow the steps outlined below:
Updating PrimeXM MT5 Gateway Rules
It is important to always check the MT5 Connector’s trading logs when you make changes to the PrimeXM MT5 gateway Parameter rules in order to verify that all parameters were successful so that you can quickly resolve any errors that may have been presented. These will be printed with the message PARSE CONFIG START.
It is especially important to check this when the Markets Open so that you can ensure that any changes you made after Market Close have not caused any errors.
Example of successful gateway parameters that will be printed in the MT5 Connector’s Trading logs:
2022-04-18 07:45:10.989|671380 [INFO ] in : msg : PARSE CONFIG START
2022-04-18 07:45:10.989|671394 [INFO ] in : msg : GatewayConfig: name=1000:Gateway value=sec=*;g=*;acc=acc1
2022-04-18 07:45:10.989|671395 [INFO ] in : msg : GatewayConfig: name=1001:Gateway value=sec=Forex\*\;c=10000\;acc=acc2
2022-04-18 07:45:10.989|671395 [INFO ] in : msg : PARSE CONFIG SUCCESS
Network Connectivity
- (1) navigate to the Gateway folder of the MetaTrader 5 History server (e.g. D:\MetaTraderServer5\History\Gateway\PXMGateway\log\YYYYMMDD_info.log);
-
(2) after the installation of the PrimeXM MT5 Gateway or a restart of the MT5 History Server, the following sequence of example messages will be printed in the plugin logs:
- PrimeXM MT5 Gateway is initialized and loaded
- [INFO] start[INFO] gateway initialized[INFO] gateway created[INFO] Gateway::run(): start[INFO] gateway started, version: 1.6.0.3[INFO] Load Data, file:D:\MetaTrader 5 Platform\History\gateway\PXMGateway\data\data.dat
- PrimeXM MT5 Gateway initiating connectivity towards the XCore environment
- [INFO] connecting: host=xcorename.primexm.com:port
- PrimeXM MT5 Gateway connectivity towards the XCore environment has been established
- [INFO] connected: host=xcorename.primexm.com:port
- PrimeXM MT5 Gateway successfully authenticated to the XCore environment
- [INFO] access granted: host=xcorename.primexm.com:port
- PrimeXM MT5 Gateway execution rules defined in the gateway configuration
- [INFO] Processor::onSymbolSync: SYMBOL_SYN[INFO] out: msg : Processor::onSymbolSync: SYMBOL_SYN[INFO] Gateway::OnGatewayStart: start[INFO] Gateway::OnGatewayStart: end[INFO] Gateway version: 1.6.0.3[INFO] out: msg : Gateway version: 1.6.0.3[INFO] GatewayConfig: name=1000: Bridge value=sec=FX;g=PXM*;acc=acc1[INFO] out: msg : GatewayConfig: name=1000: Bridge value=sec=FX;g=PXM*;acc=acc1[INFO] Processor::onLogon: GW StateConnect OK: res=0[INFO] out: msg : Processor::onLogon: GW StateConnect OK: res=0
- PrimeXM MT5 Gateway is initialized and loaded
-
(3) If the PrimeXM MT5 Gateway fails to connect the XCore environment the following sequence of example messages will be printed in the gateway logs:
- PrimeXM MT5 Gateway failed connection attempt towards the XCore environment
- [INFO] connection failed: host=xcorename.primexm.com:port
- PrimeXM MT5 Gateway failed connection attempt towards the XCore environment
Update procedure
To update the PrimeXM MT5 Gateway, you will need to follow the steps outlined below:
- (1) backup the current PrimeXM Gateway configuration file that is kept in the settings.dat file, located in the Gateway installation folder (e.g. D:\MetaTrader 5 Platform\History\Gateway\PXMGateway64\PrimeXM Gateway)
- (2) Download the latest PXMGateway64.exe file available in the Download and Changelog section of this page. Read the changelog for changes that might affect your current configuration.
- (3) copy the PXMGateway64.exe file needed for the update onto the MT5 server machine.
- (4) backup the PXMGateway64.exe file from the Gateway folder of the MetaTrader 5 History Server (e.g. D:\MetaTrader 5 Platform\History\Gateway) to be able to roll back in case the update fails.
- Note: The backup folder should be located outside the Gateway folder (e.g. D:\MetaTrader 5 Platform\Backup\)
- (5) Disable the Gateway from your MT5 Administration platform.
- (6) overwrite the existing PXMGateway64 (.exe) file with the new file, by copying the new file into the Gateway folder of the MetaTrader 5 History Server (e.g. D:\MetaTrader 5 Platform\History\Gateway).
- Note: The name of the PXMGateway64.exe file should match precisely the name of the previously installed gateway file that you are overwriting.
- (7) Enable the Gateway from your MT5 Administration platform.
- (8) Confirm the MT5 Gateway connectivity with the XCore and ensure the MT5 Gateway Configuration Parameters were parsed correctly.
Version check
In order to check what version of MT5 Gateway you currently have installed on your server, you need to follow these simple steps:
- From the Connector Status, check the time they were connected by checking the time status column as shown in the below screenshot:

- Then check the trading logs of the respective MT5 connector to find out the Gateway version:
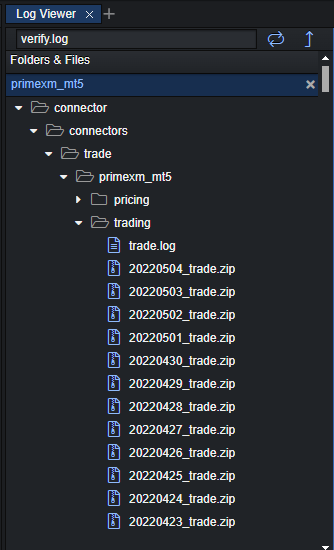
- Each time the Gateway connects, it will print the version as shown in the below screenshot:

Uninstall
To uninstall the PrimeXM MT5 Gateway, you will need to follow the steps outlined below:
- (1) stop the MetaTrader 5 History Server from Windows Services (service name: MetaTrader 5 History Server).
- (2) navigate to the Gateway folder of the MetaTrader 5 History Server (e.g. D:\MetaTrader 5 Platform\History\Gateway).
- (3) copy away or delete the PXMGateway64 folder containing the PXMGateway64.exe from the MetaTrader 5 History Server
(e.g. D:\MetaTrader 5 Platform\History\Gateway\PXMGateway64). - (4) start the MetaTrader 5 History Server from Windows Services (service name: MetaTrader 5 History Server).
- (5) if you have a fail-over/backup MT5 server, for good measure, delete the PXMGateway64 folder containing the PXMGateway64.exe from the MetaTrader 5 History Server.